How to display PrestaHero modules with Creative Element page builder
We have categorized the compatible modules into three groups based on their integration methods:
Group 1: Modules Integrated by Selecting Module Name and Hook
For modules that integrate by simply selecting the module name and corresponding hook, the process is straightforward. These modules typically have predefined hooks where their content can be displayed.
General Instructions
1. Navigate to the page customization interface:
Go to your PrestaShop admin panel and access the Creative Element page builder.
2. Add a new section:
Click on the "Add section" button to create a new section where you want the content to appear.
3. Select the "Modules" widget:
From the available widgets list, choose the "Modules" widget and drag and drop it into the newly added section.
4. Module selection:
In the module selection interface, open the dropdown menu. Scroll through the list and find the relevant module.
5. Select the appropriate hook:
Choose the corresponding hook from the options provided.
6. Save your changes:
Click the save button to apply the module content to your page.
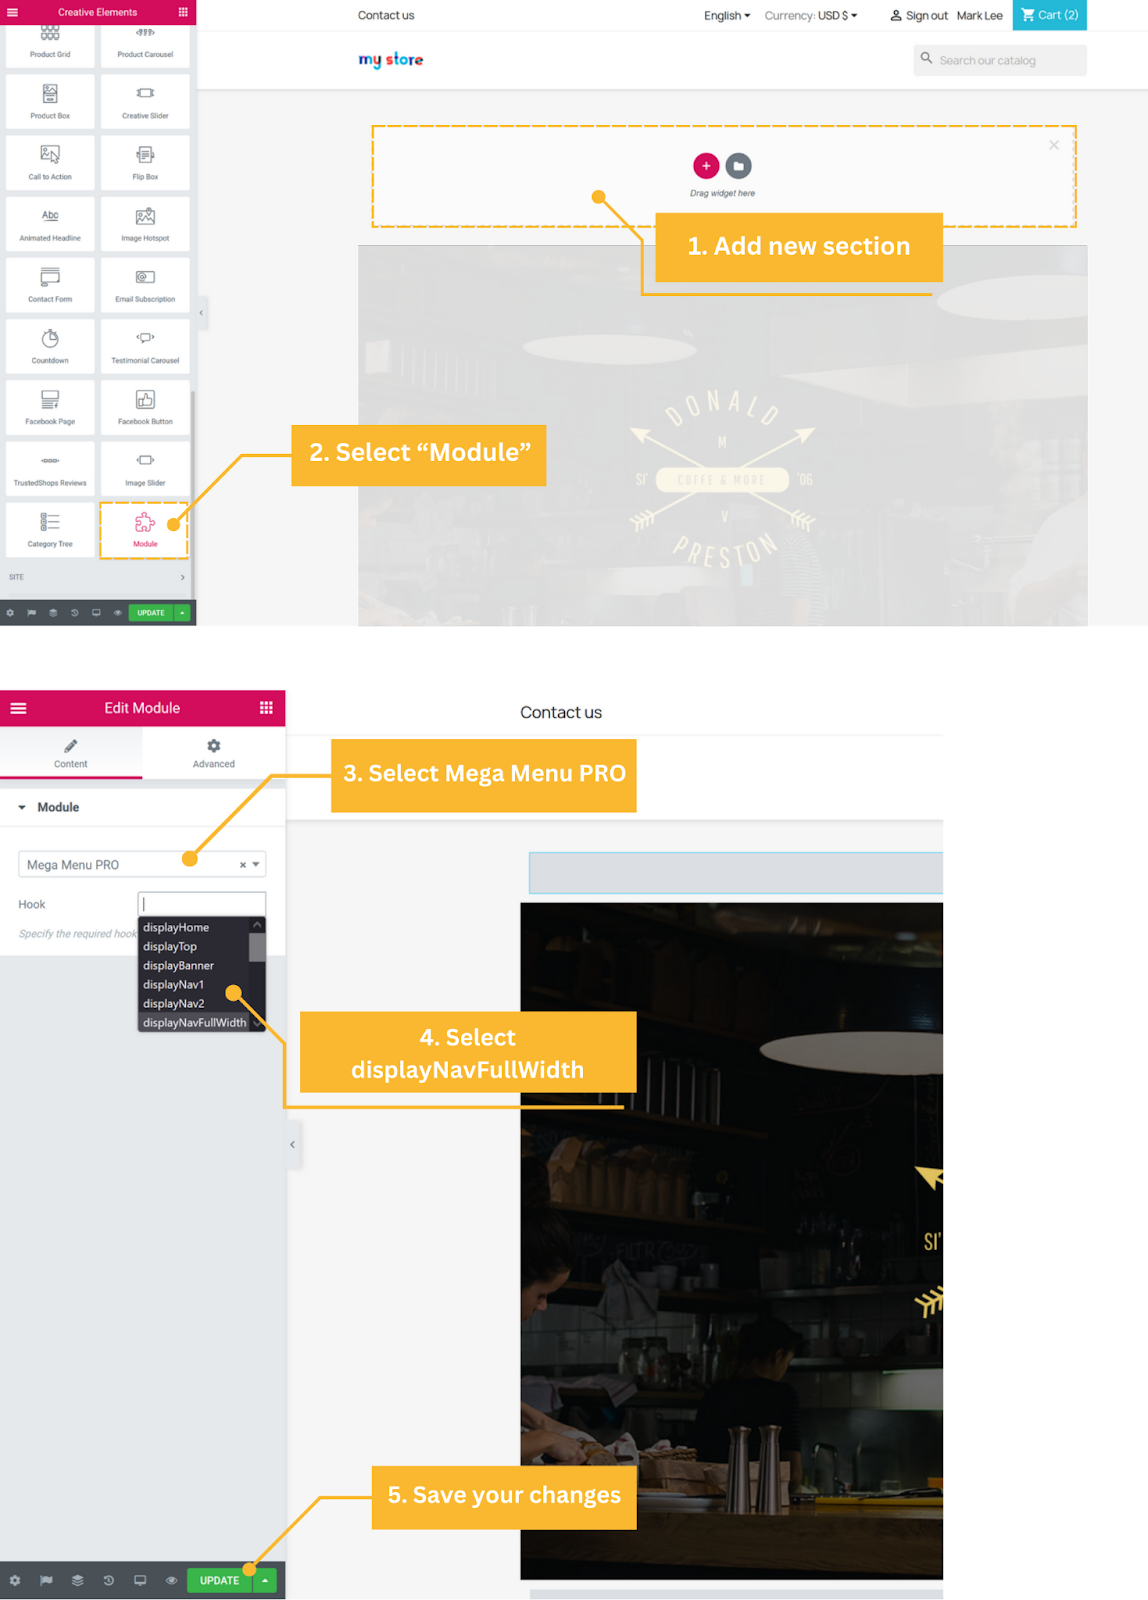
Example: “Mega Menu PRO” menu
To display the mega menu generated by our “Mega Menu PRO” module, please follow this instruction:
Step 1: Navigate to the home page customization interface of Creative Element.
Step 2: Add a new section on the page builder.
Step 3: Select the "Modules" widget from the available widgets list.
Step 4:
- In the module selection interface, open the dropdown menu.
- Scroll through the list and find the "Mega Menu PRO" module.
Step 5: For “Mega Menu PRO” module, select the hook "displayNavFullWidth" from the options.
Step 6: Save your changes to apply the “Mega Menu PRO” to your home page.
Group 2: Modules Integrated by Adding Shortcodes
Some modules generate shortcodes that need to be inserted into the page builder to display their content. These shortcodes are typically unique to the specific instance of the module's content (like a form or a specific feature).
General Instructions:
1. Navigate to the page customization Interface:
Go to the page where you want to display the content using Creative Element page builder.
2. Add a new section:
Click on the "Add section" button to create a new section.
3. Select the "Shortcode" widget:
From the available widgets list, choose the "Shortcode" widget and drag and drop it into the newly added section.
4. Enter the shortcode:
In the shortcode customization interface, enter the shortcode generated by the module.
5. Save your changes:
Click the save button to apply the shortcode to your page.
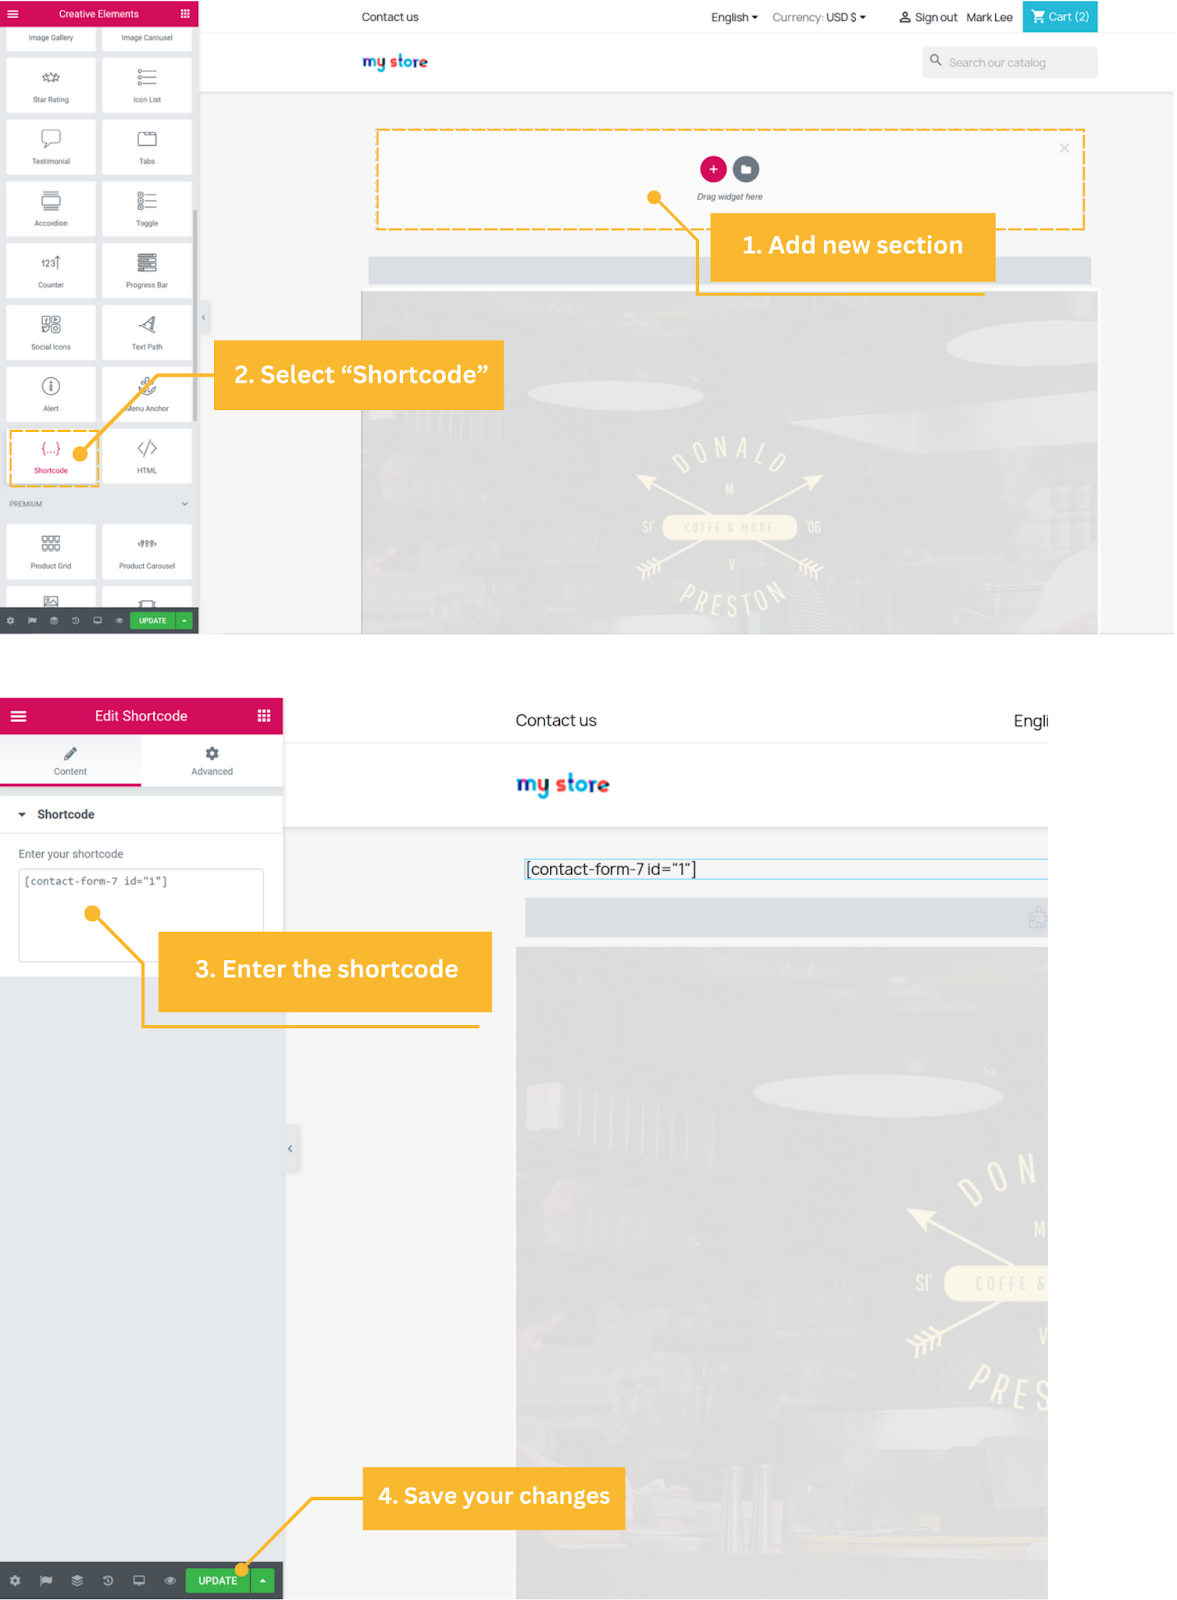
Example: Contact Form 7
For modules that provide shortcodes to display forms, such as "Contact Form Ultimate" and "Contact Form 7", you can use the generated shortcode to display the forms on your site’s front office.
Step 1: Navigate to the page customization interface of Creative Element where you want to display the form.
Step 2: Add a new section.
Step 3: Select the "Shortcode" widget from the available widgets list.
Step 4: In the shortcode customization interface, enter the shortcode for the form you want to display. For example, if you are using "Contact Form 7", enter the shortcode generated by this module.
Example: [contact-form-7 id="1"]
Step 5: Save your changes to apply the form to your page.
Group 3: Modules Integrated by Selecting Module Name and Manually Entering Hook
Certain modules require you to manually enter the hook where the content should be displayed after selecting the module name. This allows for more flexible placement of module content.
General Instructions:
1. Navigate to the page customization interface:
Go to your PrestaShop admin panel and access the Creative Element page builder.
2. Add a new section:
Click on the "Add section" button to create a new section and drag and drop it into the newly added section.
3. Select the "Modules" widget:
From the available widgets list, choose the "Modules" widget.
4. Module selection:
In the module selection interface, open the dropdown menu. Scroll through the list and find the relevant module.
5. Enter the hook manually:
Enter the specific hook for the module to display its content.
6. Save your changes:
Click the save button to apply the module content to your page.
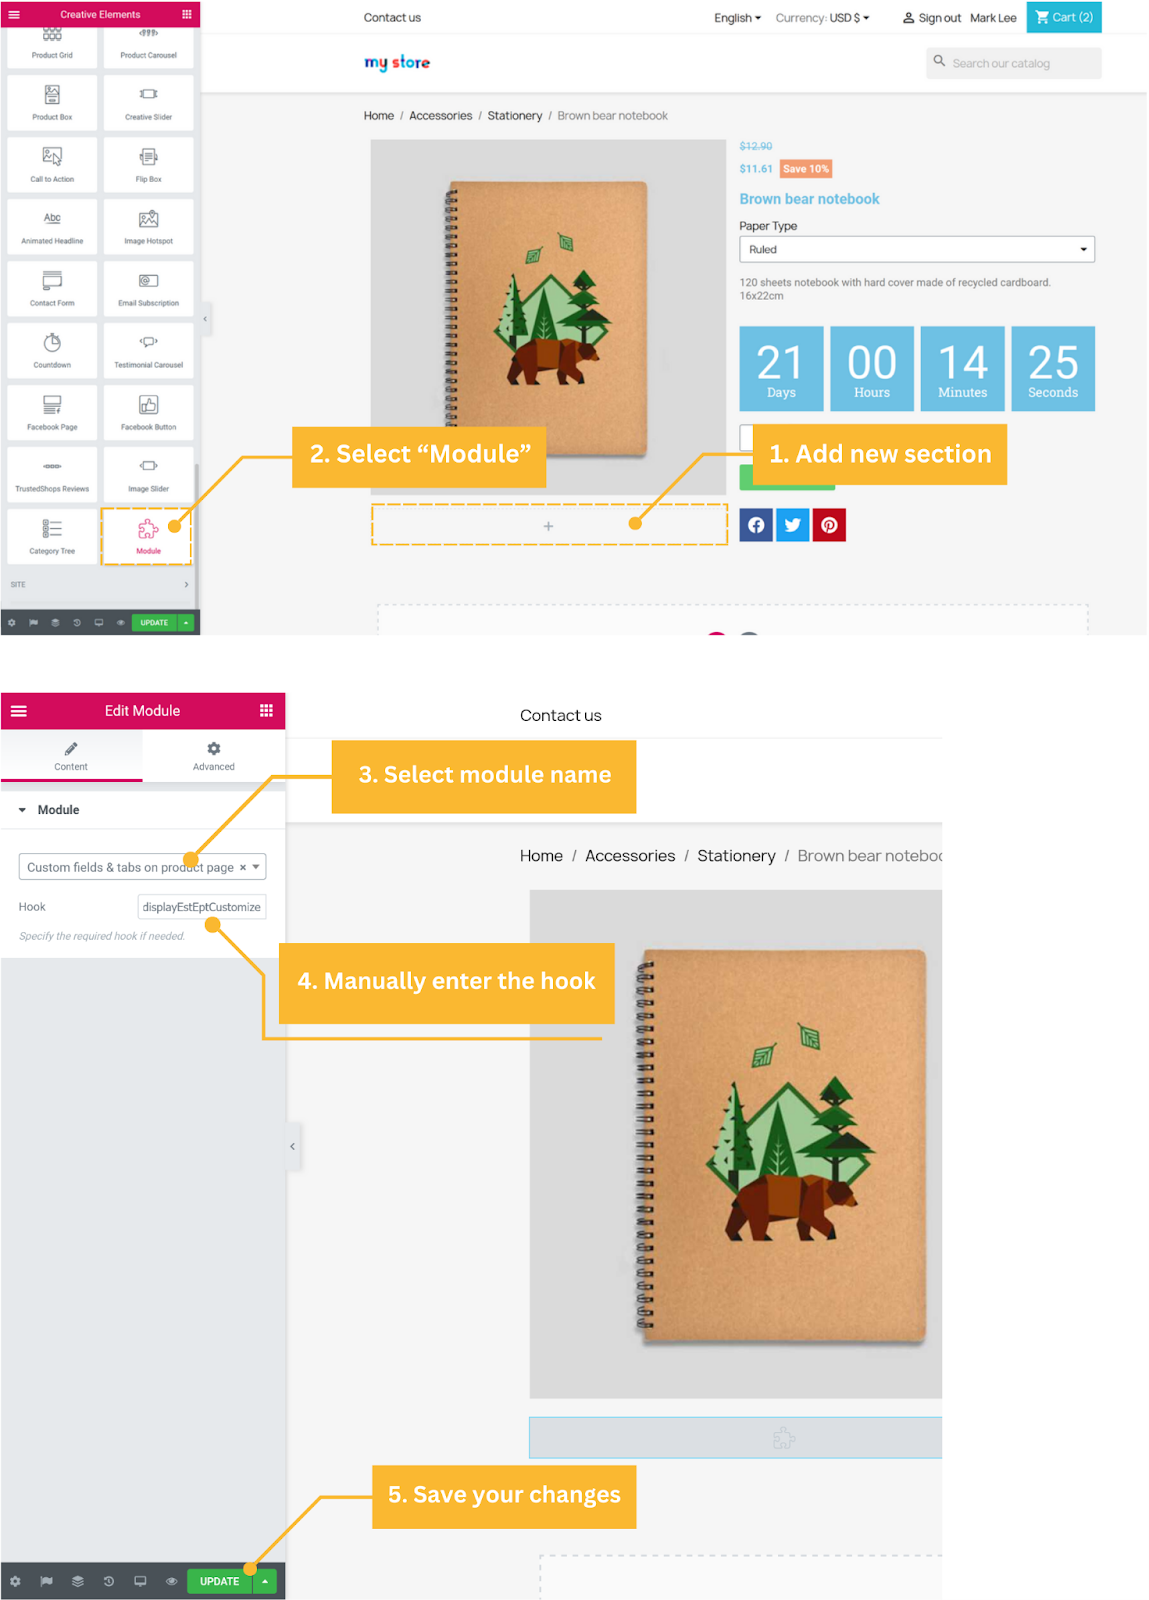
Example: Custom fields & tabs on product page
With modules that support displaying content in many special, uncommon locations such as "Custom fields & tabs on product page", you need to manually define the hook to be able to display the desired content via Creative Element page builder.
Step 1: Navigate to the page customization interface of Creative Element where you want to display the product custom field/product extra tab.
Step 2: Add a new section.
Step 3: Select the "Module" widget from the available widgets list.
Step 4:
- In the module selection interface, open the dropdown menu.
- Scroll through the list and find the "Custom fields & tabs on product page" module.
Step 5: Manually enter the hook you want to display the product extra info into the “Hook” field. In this example, we will enter the "displayEstEptCustomize" hook.
Step 6: Save your changes.
We will continue to provide specific integration guides for each module in the Resource section of the respective module. You can find detailed instructions in the module's documentation.
Group 4: Modules Supporting Blog Content Editing
For the PrestaHero BLOG module, only blog post content can be edited using Creative Elements. Other elements like categories, comments, and votes cannot be modified through Creative Elements.
How to edit blog post content
- Navigate to the BLOG module configuration page. Go to the "Posts" tab.
- In the post list, find the post you want to edit and click "Edit."
- On the post editing page, select the "Basic content" tab.
- Click the "Edit with Creative Elements" button to open the editor. You can add, edit, or delete supported elements such as text, videos, Google Maps, icons, etc.
- After editing, click "Update" to save your changes.
Conclusion
By following these simple steps, you can effectively integrate and display content from PrestaHero modules using the Creative Element page builder. This not only enhances the functionality of your PrestaShop site but also provides a seamless user experience.
We will continue to add specific integration guides for each module in the Help Center, under the Resource section of each module. You can find detailed instructions for each module there.
If you encounter any difficulties integrating PrestaHero modules with Creative Element, please don't hesitate to contact our customer support team.