PrestaShop Hooks Explained: Visual Guide with Examples
I. Basics of hooks
Hooks in PrestaShop can be thought of as anchor points within the front office interface. When a module needs to display content at a specific position, process data, or extend functionality within the store; the module will call the appropriate hook to accomplish these tasks.
Here are some fundamental aspects of hooks:
- A hook is a predefined point in the PrestaShop template where modules can insert their content. In addition to these predefined hooks, modules can also create custom hooks to further extend and tailor the functionality to specific needs.
- Multiple modules can call the same hook to display their content in the same position. Modules installed first will be displayed first when they call the same hook (from left to right, top to bottom).
- You can also rearrange the display order of modules within each hook in the backend by dragging and dropping them.
- In addition to display hooks, there are also processing hooks. These hooks are used to handle information rather than display it. For example, the actionValidateOrder hook can be used to process data whenever an order is validated.
Example hooks:
- displayHome: This hook allows modules to display content on the home page.
- displayLeftColumn: Modules using this hook will display their content in the left column of the layout.
- displayRightColumn: Similar to the left column, but for the right column.
- displayFooter: This hook is used to display content in the footer of the page.
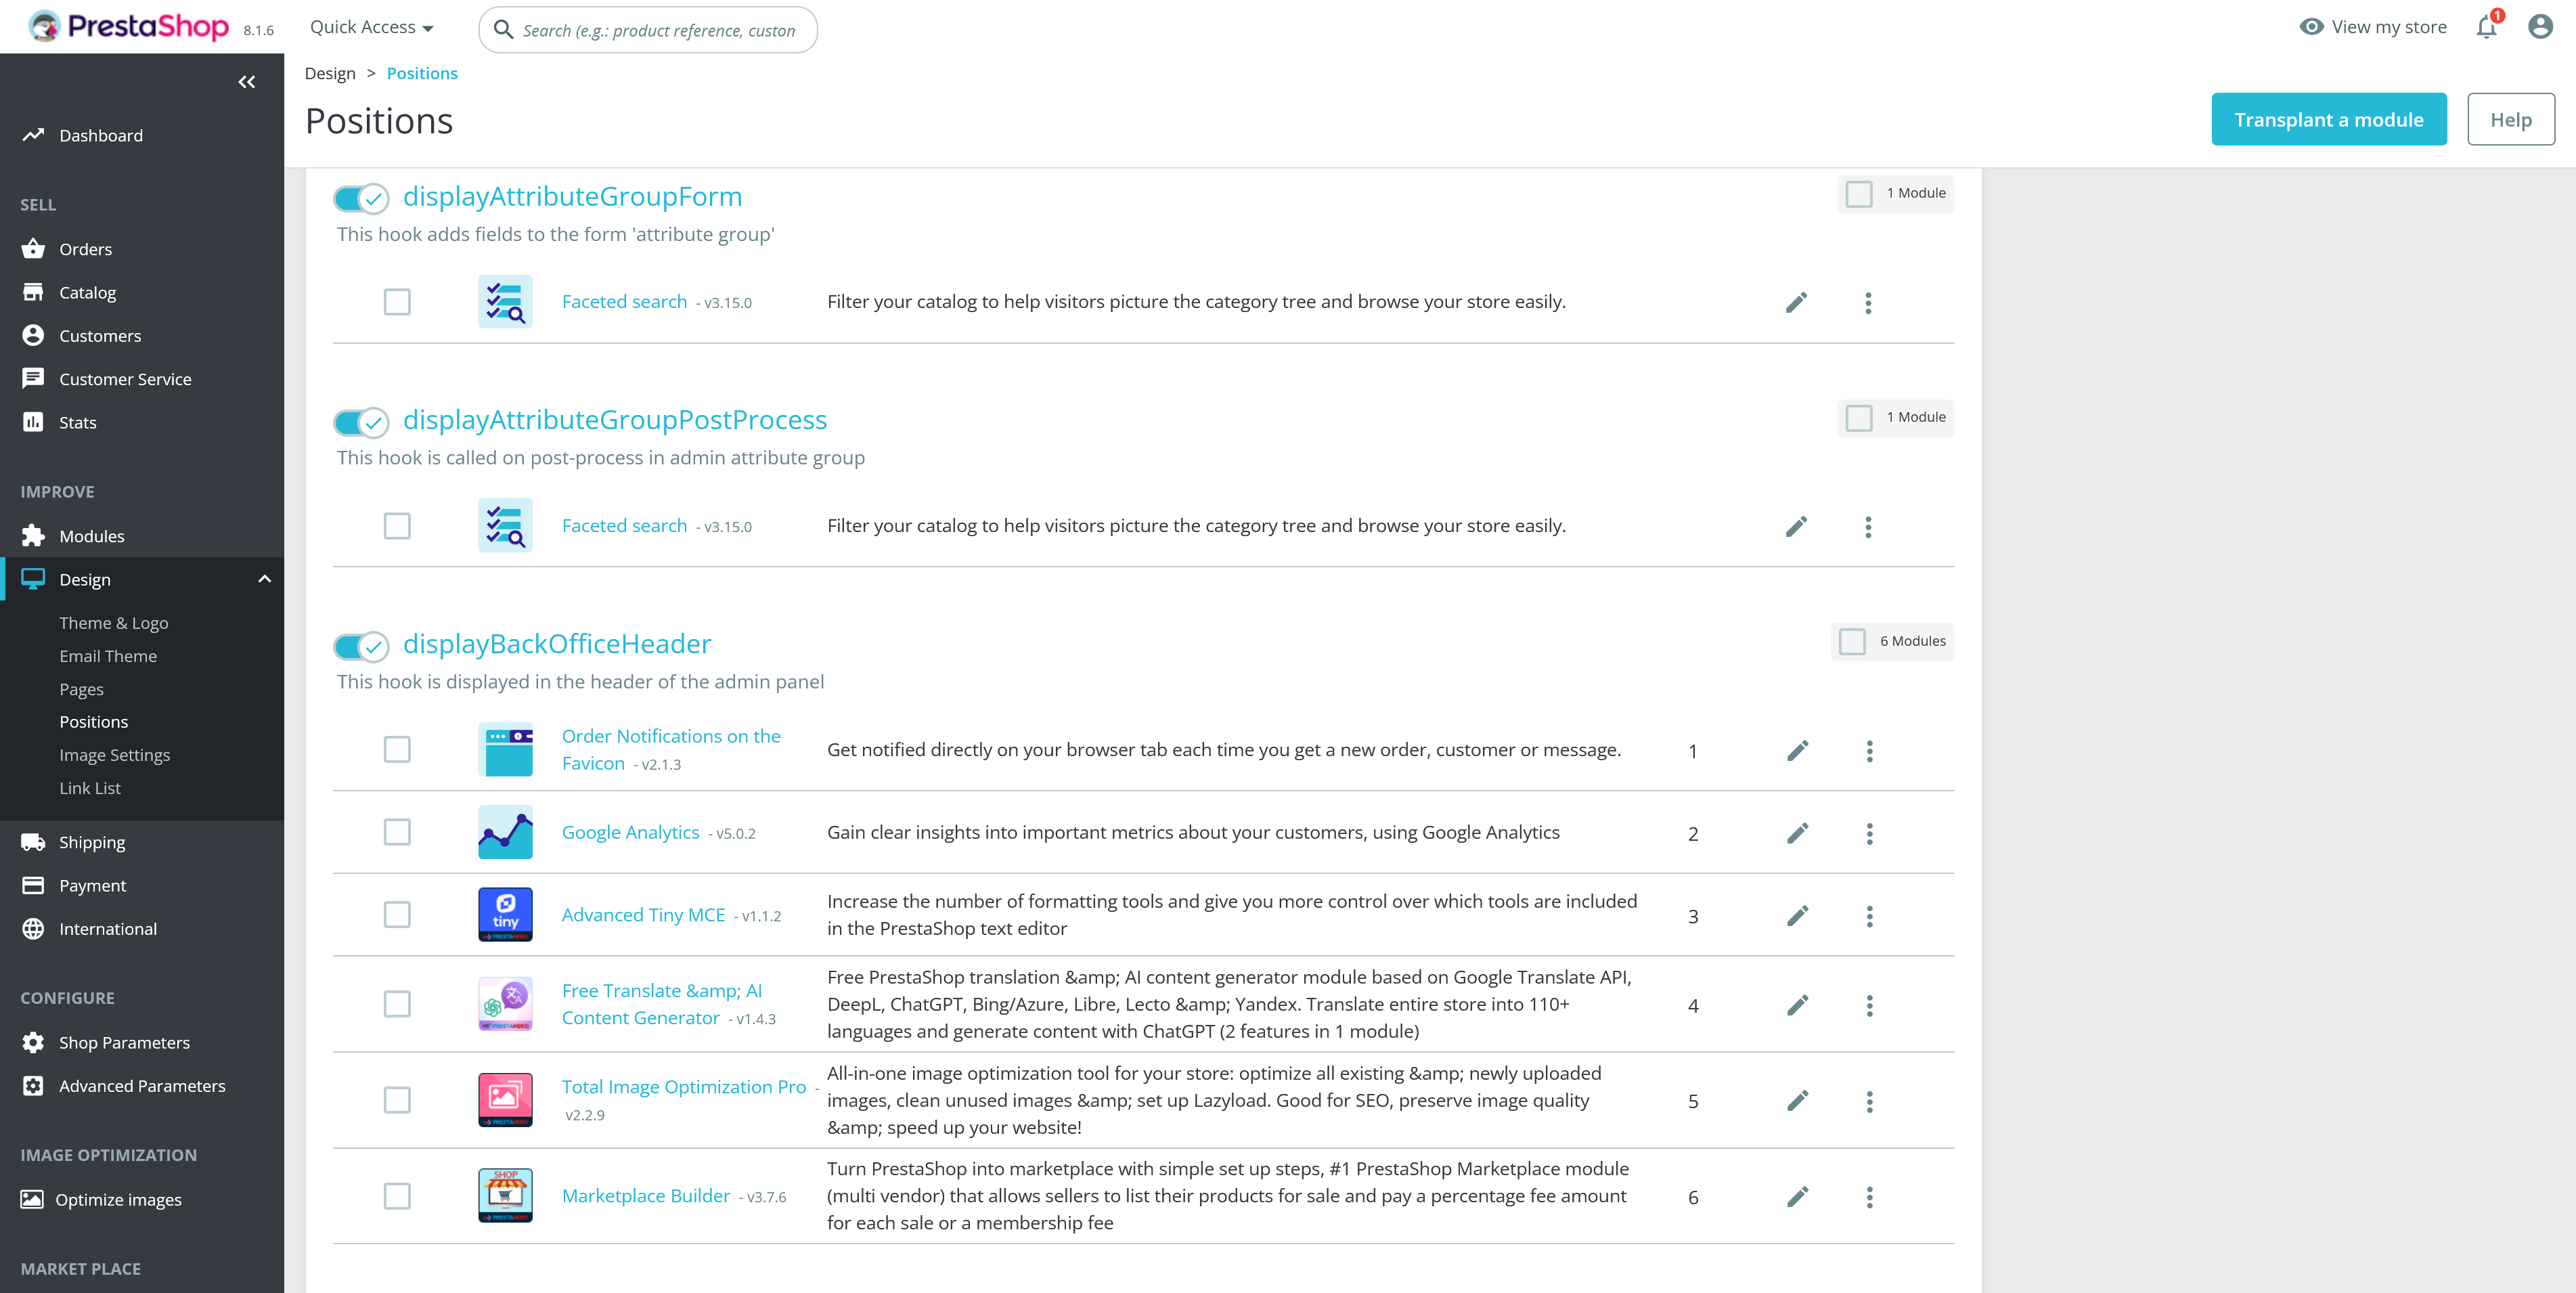
To further illustrate the concept of hooks and how they can be managed, here is an example from the PrestaShop back office. In the "Design > Positions" section, you can see a list of all available hooks and the modules assigned to each hook.
II. Common hooks in PrestaShop websites
To help you visualize where common hooks are located, here are some examples for different pages on a PrestaShop site:
| Page | Hook position |
|---|---|
| Homepage | |
| Category page | |
| Added to cart popup | |
| Shopping cart page | |
| Checkout page | |
| Order confirmation page | |
| Contact page | |
| CMS page | |
| Create account page | |
| Login page | |
| My account page |
III. Transplant a module to a hook
The "Transplant a module" feature in PrestaShop allows you to attach or "hook" a module to a specific position within your store, either in the front office (what customers see) or the back office (admin area). The purpose of this feature is to give you control over where and how your modules display their content on your website. By transplanting a module, you can customize the layout and functionality of your store, ensuring that important content or features are displayed exactly where you want them to be.
Steps to transplant modules thoughtfully:
- Step 1: Determine which hooks are relevant for the module you want to transplant. Avoid attaching modules to hooks that do not enhance the functionality or user experience of your store.
- Step 2: Be mindful of potential conflicts with other modules. Transplanting multiple modules to the same hook might cause layout issues or errors. Ensure that each module is compatible with the hook you choose.
- Step 3: From website back office, navigate to "Design > Positions” page. At the top right of the "Positions" page, click on the "Transplant a module" button.
- Step 4: In the "Module" dropdown menu, select the module you want to transplant.
- Step 5: In the "Transplant to" dropdown menu, select the hook where you want the module to appear. Hooks are predefined positions in your template where modules can be inserted.
- Step 6: After selecting the module and hook, click the "Save" button to confirm the transplantation.
- Step 7: After transplanting a module, test its functionality and appearance on your site. Check for any errors or layout issues that might arise from the new placement.
Example: Properly transplanting the "Home Products PRO" module
Let's consider the "Home Products PRO" module developed by PrestaHero. This module is designed to display products on your homepage, categorized into tabs or rows. We’ll go through an example to illustrate the correct way to transplant this module.
Step 1: Determine where the module needs to perform its tasks.
To find out which hooks a module uses (or which hooks the module is registered to), you can check this in 2 ways:
- Method 1: Check in the PrestaShop Back Office:
- Go to your PrestaShop back office.
- Navigate to Design > Positions.
- Click on the “Transplant a module” button at the top right corner of the screen.
- In the “Module” field, select the module name you want to check from the dropdown.
- In the “Transplant to” field, open the dropdown menu. You will see a list of hooks under the “Already registered hooks” section. These are the hooks the module is currently using. Additionally, there is an "Available hooks" section that shows hooks which are available but not yet registered. This allows you to easily transplant the module to new hooks to display it in different positions. In some cases, if there’s an issue and a hook that should be registered is not functioning, it will also appear in the "Available hooks" section, and you can manually transplant it without any difficulty.
- Method 2: Check in the module code.
Please refer to the “How to find hooks in the module’s code” section in part VI. for details.
For "Home Products PRO", the key hook would be displayHome, as this is where you want the products to appear on the homepage.
Step 2:
- Go to your PrestaShop back office.
- Navigate to Design > Positions.
- On the Positions page, you can see which hooks are already in use. This helps you avoid unnecessary or duplicate hooks.
Step 3: Click on the "Transplant a module" button at the top right.
- Select "Home Products PRO" from the Module dropdown.
- Choose the displayHome hook, which is specifically designed for placing content on the homepage.
Step 4: After selecting the module and hook, click the "Save" button to confirm the transplantation.
Step 5: After transplanting the module, test its functionality and appearance on your site. Check for any errors or layout issues that might arise from the new placement.
IV. Troubleshooting hook-related issues
How to find hooks in the module’s code
Finding the correct hooks is crucial because hooks define where and when a module performs its tasks within your PrestaShop store. Without the proper hook registration, the module won’t function correctly or may not appear in the desired locations on your website.
Checking the hook names in the module code allows you to confirm which hooks the module is designed to work with. Sometimes, the module might not be registered to the correct hook, or you may want to customize its behavior by attaching it to additional hooks. By identifying these hooks in the code, you can manually register or transplant the module to the appropriate hook positions, ensuring it operates as intended.
To locate hooks within a module's code, you can use a code editor to navigate and search for specific functions where hooks are declared. Here’s how you can effectively find hooks in the code:
Step 1: Open the module's main PHP file in your code editor. Typically, this file shares the module's name, like ets_imagecompressor.php for the "Image Optimization Pro" module by PrestaHero.
Step 2: Use the search function in your code editor to find the install() function within the module's main PHP file. This function is crucial as it often contains declarations for all hooks used by the module.
Step 3:
- Once you've found the install() function, carefully examine the code within it.
- For modules that don’t explicitly list hooks, proceed with the following steps: Look for lines of code that explicitly register hooks using functions like registerHook().
- Check the registerHook() function to identify the hooks declared inside.
- These registrations typically associate specific actions or content placements with predefined hooks in PrestaShop.
Below is an image highlighting the section in the "ets_imagecompressor.php" file where hooks are registered:
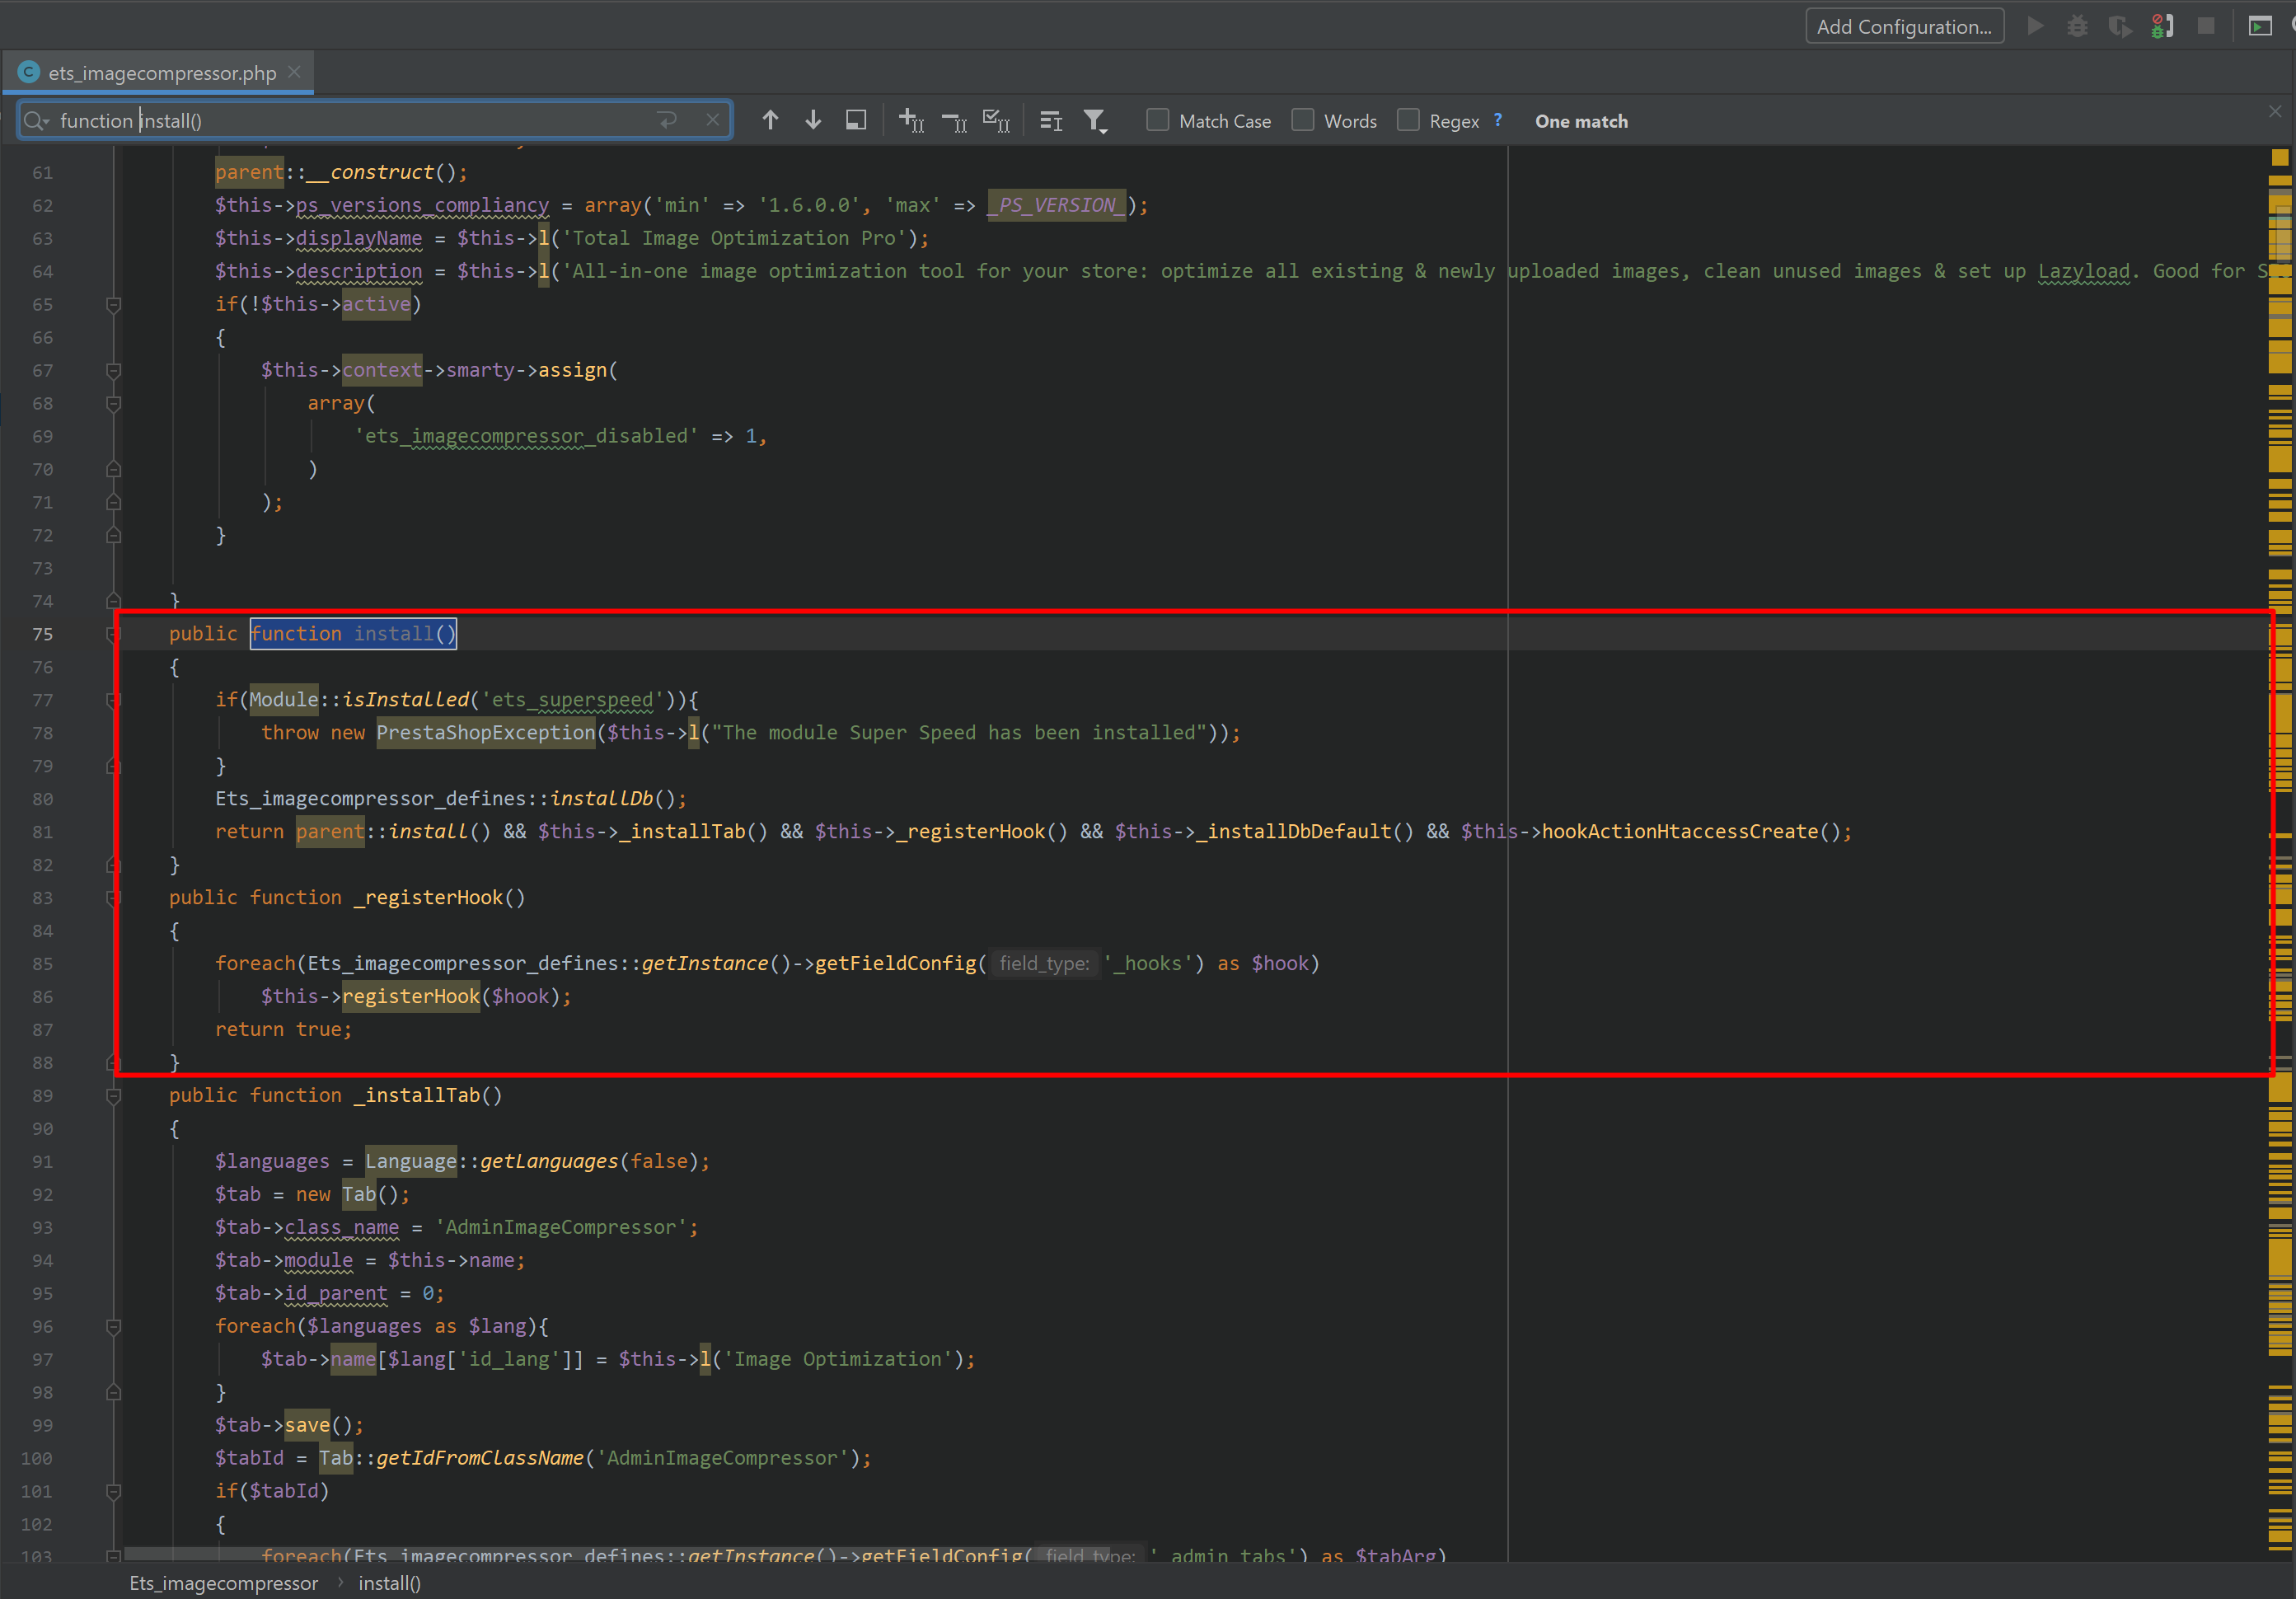

By following these steps, you can effectively explore and understand how hooks are implemented within a PrestaShop module, facilitating better integration and troubleshooting when necessary.
Troubleshoot CSS errors on the module configuration page
When configuring modules in PrestaShop, you may sometimes encounter interface or CSS issues. These issues can manifest as misaligned elements, broken layouts, or unstyled pages in the module configuration area. One common cause of these problems is the improper handling of the displayBackOfficeHeader hook. This hook is crucial because it allows modules to include necessary CSS and JavaScript files in the back office.
Example: Troubleshooting CSS issues with the "Marketplace Builder" module
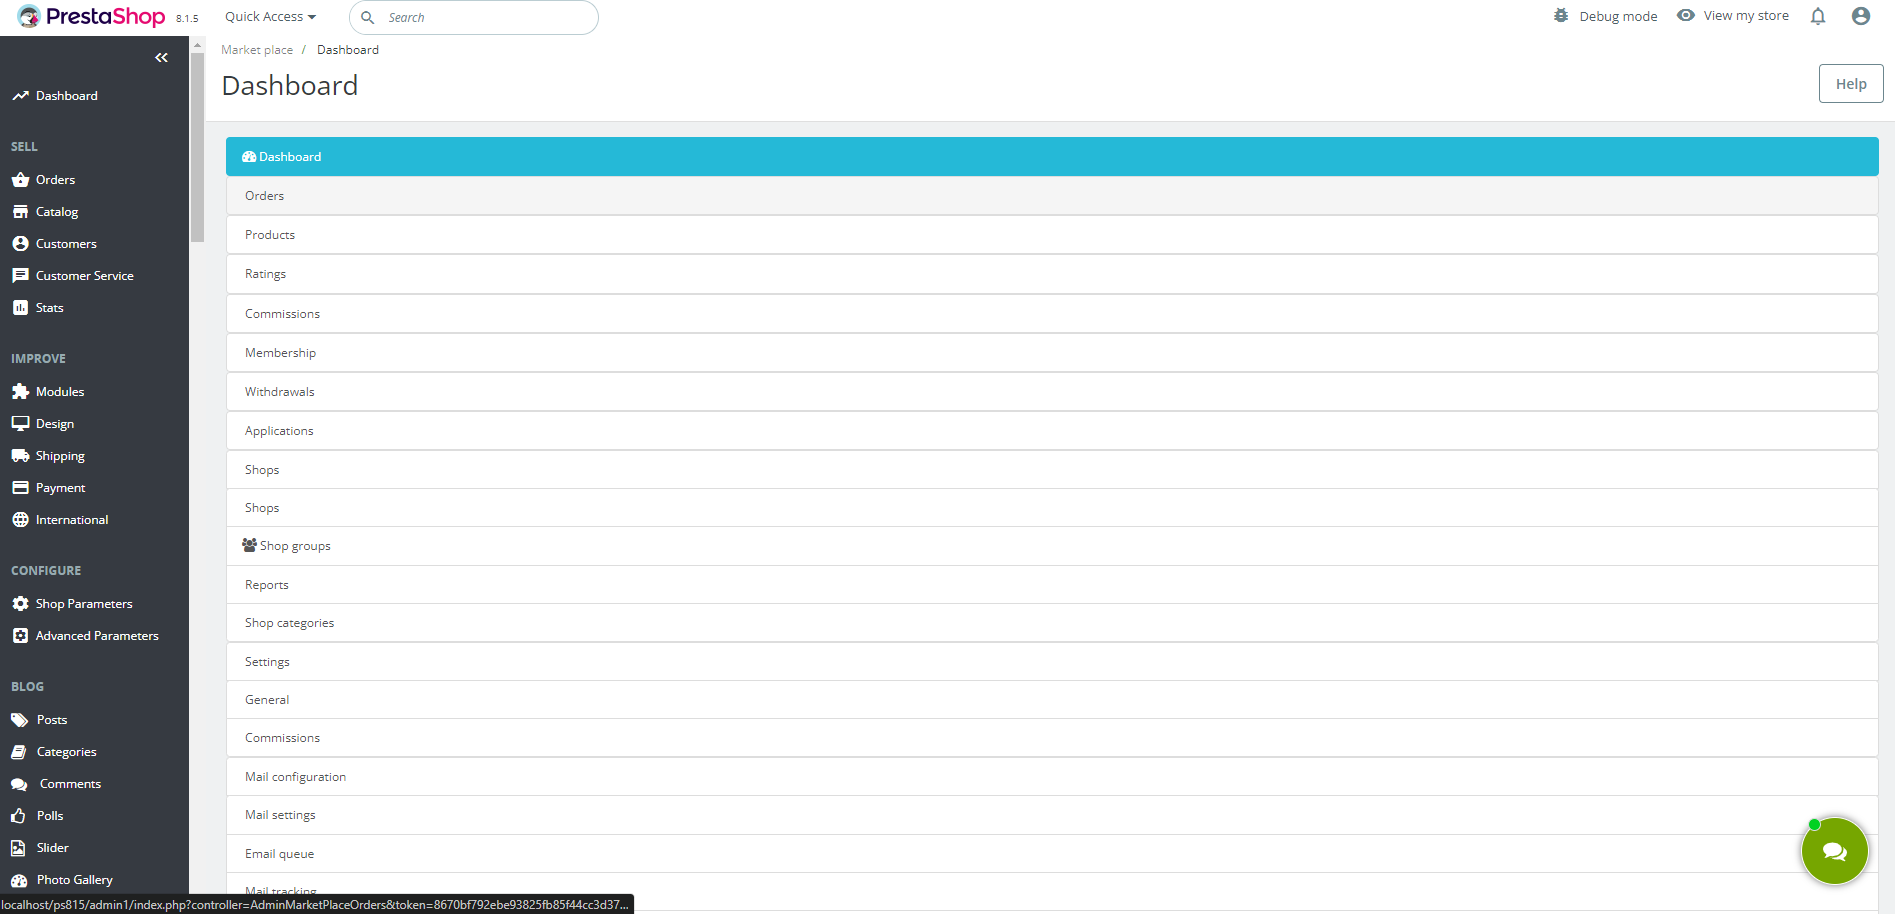
You have installed the “Marketplace Builder” module on your PrestaShop website. The configuration page of this module has CSS errors. The main menu and dashboard layout are broken, with missing or incorrect styles, making it difficult to navigate or use the module.
Reason: For some special cases, the module is not properly utilizing the displayBackOfficeHeader hook, which is essential for loading the necessary CSS and JavaScript files in the back office.
Solution: Follow these steps to resolve the CSS issues by adding the module to the displayBackOfficeHeader hook.
Step 1: From the website back office, ****open the "Design > Positions" page.
Step 2: At the top right of the "Positions" page, click on the "Transplant a module" button.
Step 3:
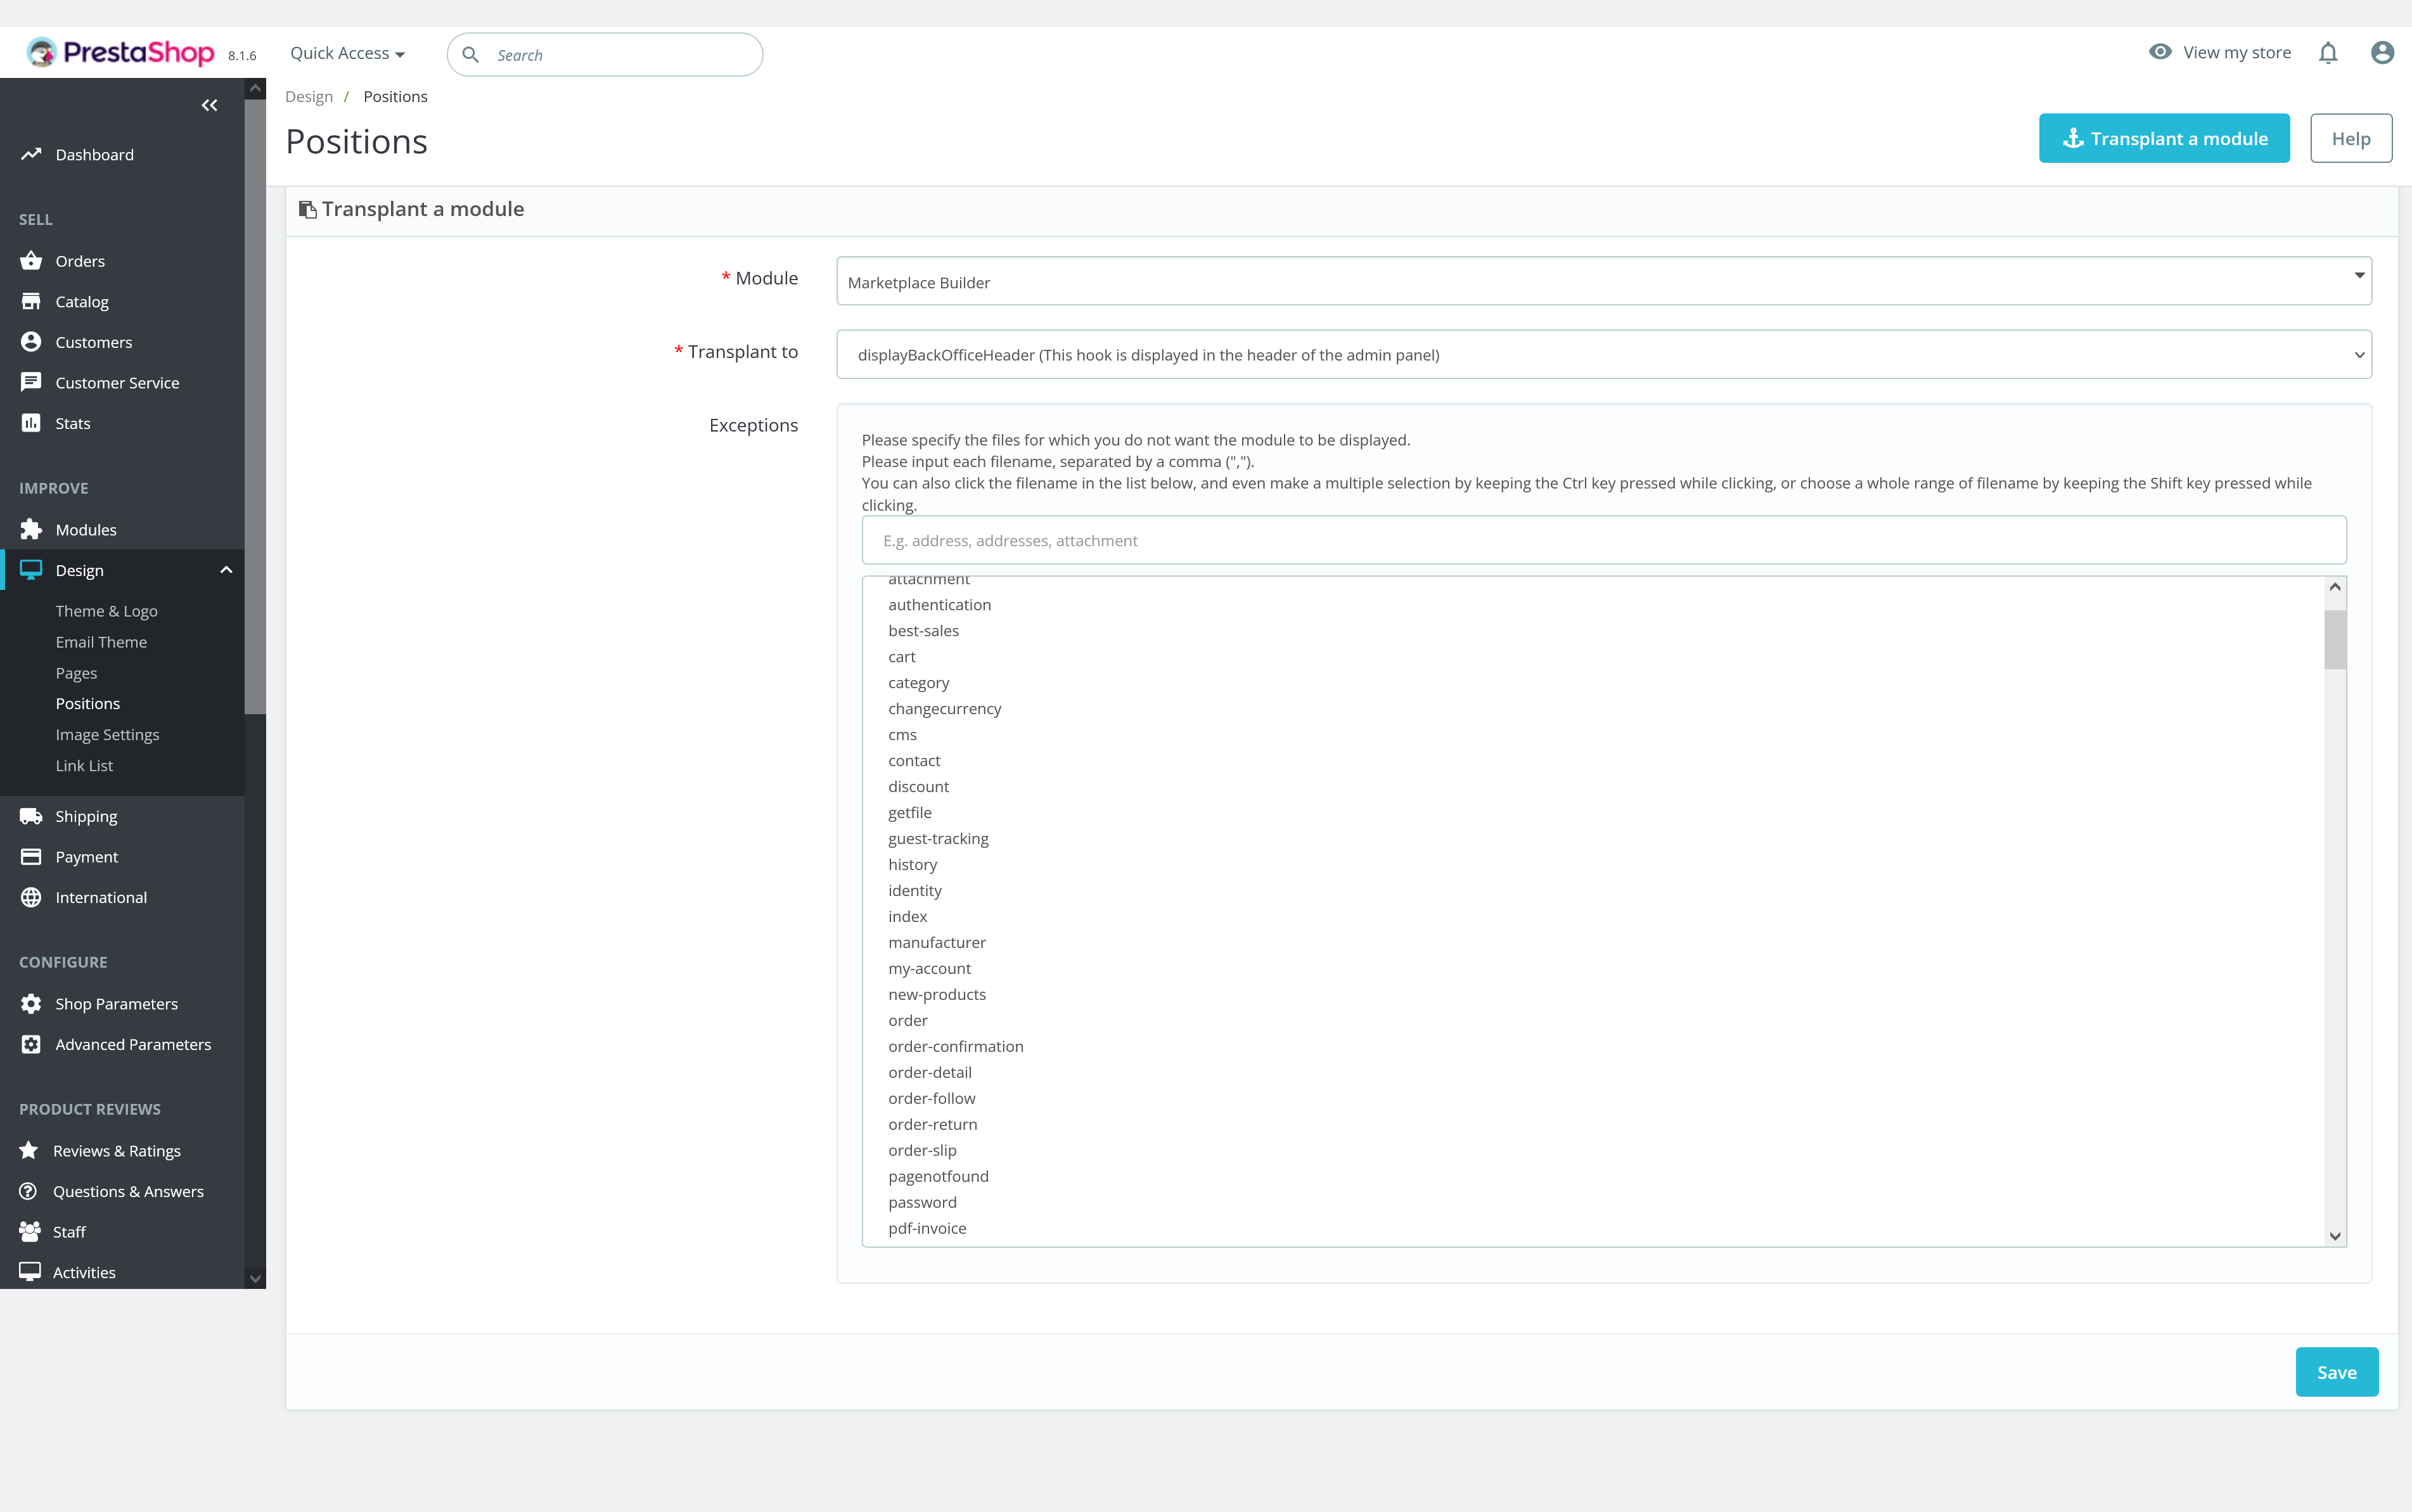
- In the "Module" dropdown menu, select the custom module experiencing CSS issues.
- In the "Transplant to" dropdown menu, select displayBackOfficeHeader.
- Click "Save" to confirm the transplantation.

Step 4: Return to the configuration page of the Marketplace Builder module. The CSS issues should be resolved, and the interface should look as intended.
By ensuring that your module is properly hooked into the displayBackOfficeHeader, you can avoid CSS issues and maintain a consistent and functional back office interface.
Not enable modules and necessary hooks
When troubleshooting issues in PrestaShop, it's important to confirm that the relevant modules are enabled and their hooks are activated. This ensures that the modules can function properly and interact with the system as expected.
Let's consider a common issue where a module, such as "Image Optimization Pro" developed by PrestaHero, is installed but not functioning correctly. Even though the module appears to be installed and hooked correctly, it doesn't perform as expected.
Symptoms:
- The module's features are not visible or operational in the back office.
- Expected improvements or optimizations by the module are not effective.
- Module-related actions (e.g., image optimization) are not working.
Reason:
- The module may not be enabled.
- Necessary hooks for the module might not be activated.
Solution: Ensure module and hooks are enabled
To resolve this issue, follow these detailed steps to check and enable your module and its necessary hooks:
Step 1: Check module status
- Navigate to your PrestaShop back office.
- Go to Modules > Module Manager.
- Search for "Image Optimization Pro".
- Ensure the module is enabled. If it is disabled, click on the "Enable" button.
Step 2: Verify hook activation
- Go to Design > Positions.
- Ensure that the necessary hooks for the module are activated. For instance, check if displayBackOfficeHeader is listed with the "Image Optimization Pro" module.
Step 3: Activate missing hooks
- If the module is not listed under the required hooks, you need to transplant it.
- Click on "Transplant a module" at the top right.
- Select "Image Optimization Pro" from the module dropdown.
- Choose the necessary hooks like displayBackOfficeHeader, displayHeader, displayImageCleaner, etc., depending on the module’s functionality.
- Click "Save".
Step 4: Clear cache and refresh
- Clear your PrestaShop cache to ensure the changes take effect.
- Refresh the relevant pages to check if the module is now working correctly.
By ensuring that your module is enabled and hooked correctly, you can resolve issues related to module functionality and ensure that the features are operating as intended.
V. Conclusion
Understanding and effectively using hooks in PrestaShop can significantly enhance your ability to customize and manage your online store. By following this guide, you should now have a solid grasp of what hooks are, how to use them, and how to troubleshoot common issues. Whether you're a store owner or a developer, mastering hooks is key to leveraging the full potential of PrestaShop.
Feel free to explore and experiment with hooks to see how they can improve your PrestaShop store's functionality and user experience.