

PrestaShop Image Optimization: Compression, WebP, Lazy Loading and Image Quality Explained
Images can make up a large part of a PrestaShop page. Product photos, category banners, sliders and thumbnails all add data that the browser must download.
Image optimization reduces this data without making your store look worse.
For most PrestaShop stores, there are four main things to check:
Image dimensions → Compression → Image format → Loading behavior
Each solves a different problem:
- Dimensions: Is the image larger than the page actually needs?
- Compression: Can the file contain fewer bytes without a noticeable loss of quality?
- Format: Would JPEG, PNG or WebP be more suitable?
- Loading behavior: Does the image need to load immediately, or can it wait until the visitor scrolls closer to it?
A good image optimization process handles all four instead of relying on one compression setting.
Why Large Images Can Slow Down a PrestaShop Store
Every image has to be downloaded before the browser can display it.
If a category page loads ten product images at 500 KB each, those images alone can add about 5 MB of data. On a fast desktop connection, this may not feel serious. On mobile or a slower connection, it can make the page noticeably slower.
Images can also affect Largest Contentful Paint (LCP). The LCP element is often a large image near the top of the page, such as:
- a hero banner;
- a main product image;
- a large promotional image.
If that image takes longer to download, LCP may also happen later.
The basic relationship is simple:
Larger image file → more data to download → potentially slower rendering and LCP
Image optimization will not fix every performance problem. A store can still be slow because of high TTFB, slow database queries, heavy JavaScript or third-party scripts. But when images make up a large part of the page weight, they are a good place to start.
What to Optimize in Your PrestaShop Images
1. Check Image Dimensions First
Image dimensions are the width and height of an image in pixels. They are different from file size.
Avoid loading images that are much larger than their displayed size. As a practical rule, an image around 2× its maximum displayed size is usually enough to stay sharp on high-density screens.
For example:
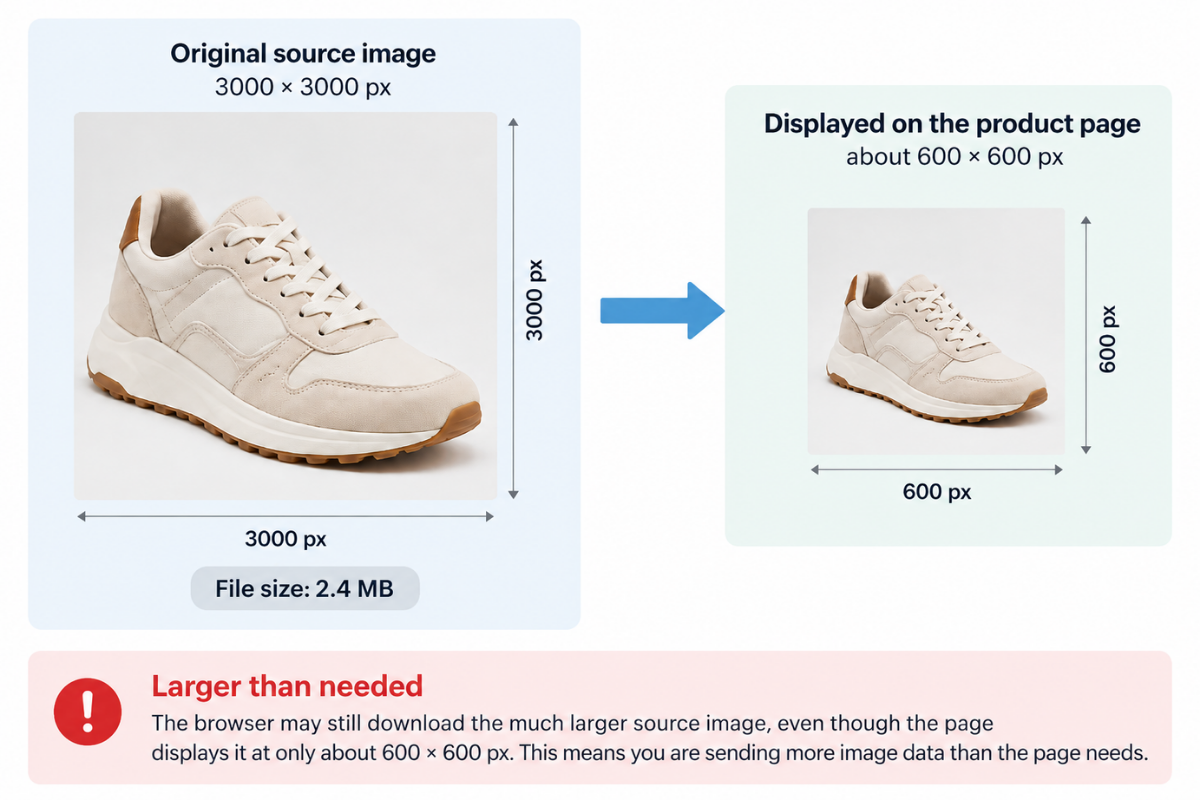
- Displayed size: 600 × 600 px
- Recommended image size: around 1200 × 1200 px
- Loading a 3000 × 3000 px image would usually be unnecessary.
How to check the displayed image size
You can check this directly in your browser:
- Open the page in Chrome or another browser with developer tools.
- Right-click the image and select Inspect.
- Select the <img> element.
- Check the size at which the image is rendered on the page.
- Compare it with the dimensions of the actual image file.
If the source image is several times larger than its displayed size, review whether a smaller PrestaShop image type would be more appropriate.
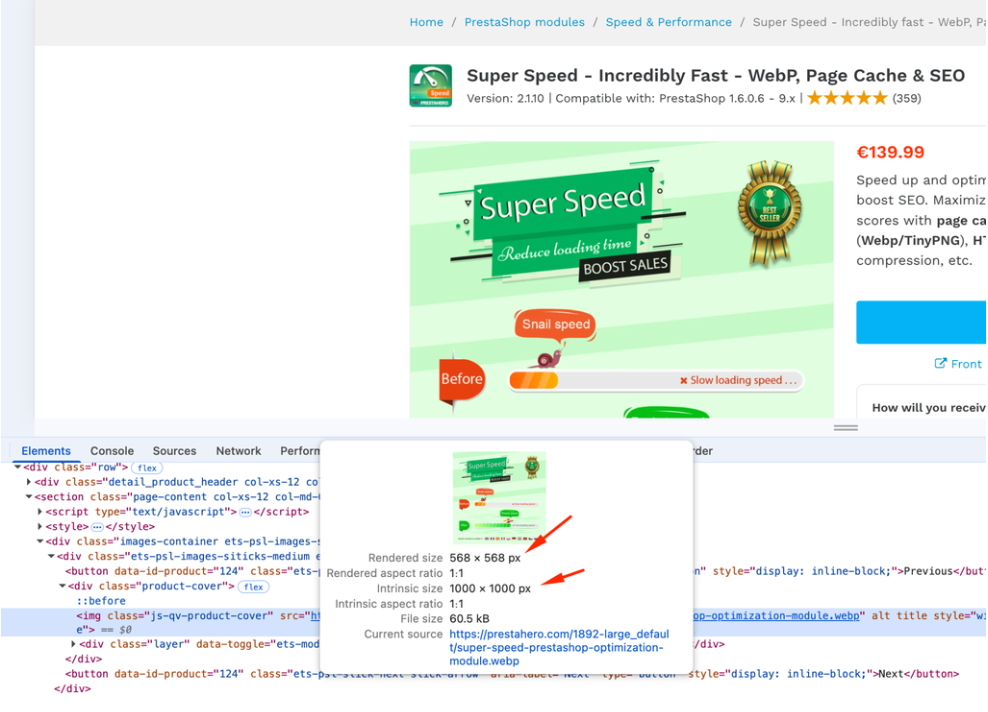
Example from our product page: The product image is displayed at about 568 × 568 px, while we use a 1000 × 1000 px image to keep it sharp on high-density screens.
Correct dimensions should come before compression. Compressing an image helps reduce its file size, but it does not solve the problem of sending far more pixels than the page needs.
2. Check File Size and Compress Heavy Images
After dimensions, check how large the actual image files are.
There is no single file-size limit that works for every image. A large hero banner needs more data than a small product thumbnail. A detailed fashion photo may also need a larger file than a simple graphic.
Still, these values can be useful as practical starting points:
- Below 100 KB: often good for thumbnails and smaller storefront images.
- Around 100–200 KB: often reasonable for normal product images when quality remains good.
- Around 200–500 KB: worth reviewing. The size may be justified for a large or detailed image, but check whether it can be reduced.
- Above 500 KB: usually worth investigating for a normal storefront image.
These are not strict SEO rules. Visual quality, image dimensions and how many images appear on the page matter more than hitting a specific number.
A single 300 KB image may be completely reasonable. Twenty 300 KB images loading together can be a much larger problem.
How to find the heaviest images on a page
Chrome DevTools provides a quick way to find them:
- Open the page.
- Open Developer Tools → Network.
- Reload the page.
- Filter the requests by Img.
- Sort the list by Size.
Start with the largest files.
Then ask:
- Is this image larger than the page needs?
- Can it be compressed further?
- Is its format appropriate?
- Does it need to load immediately?
This is often more useful than trying to optimize every image equally.
3. Understand What Compression Actually Does
Compression reduces file size.
The goal is not to make every image as small as possible. The goal is to make it smaller without damaging the visual details that matter.
There are two common types of compression.
Lossless compression reduces file size while preserving the original image data. Image quality is preserved, but the reduction in file size is usually smaller.
Lossy compression removes some image data to create a smaller file. Moderate compression may be difficult to notice, but stronger compression can make the image blurry or create visible artifacts.
A simple example might look like this:
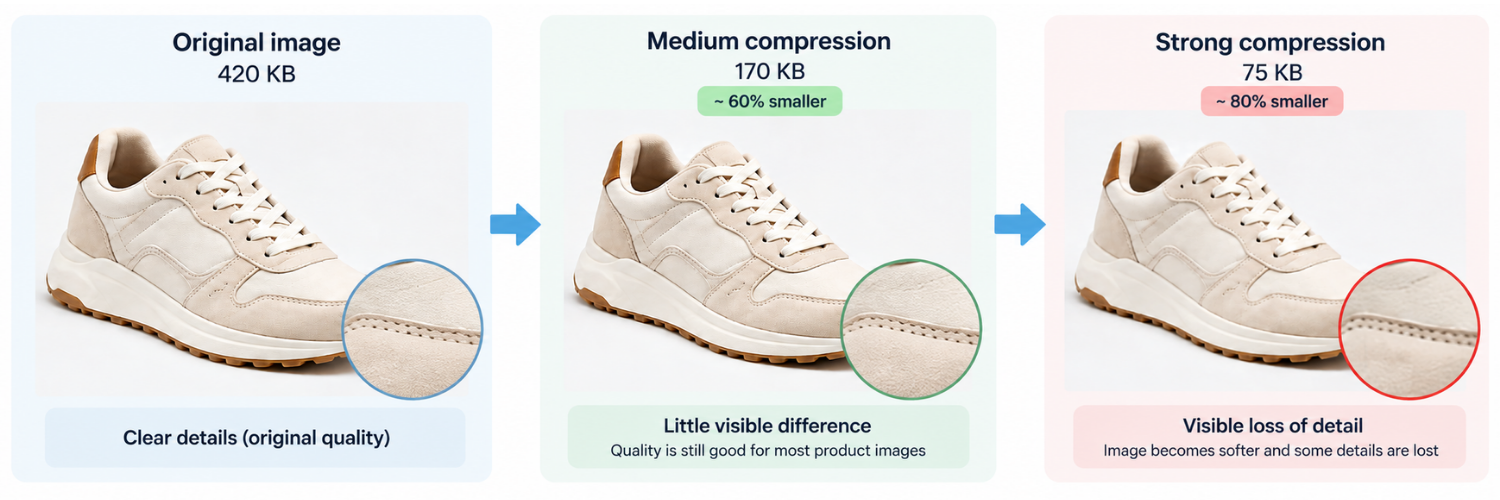
This is the main trade-off in image compression:
smaller file size ↔ visual quality
For ecommerce images, do not optimize only for the smallest possible number. Customers may need to see texture, color, labels or other product details before buying.
4. Choose an Image Quality Setting You Can Test
There is no universal image-quality percentage that is best for every store.
The same setting can produce different results depending on:
- the original image;
- the compression method;
- the amount of detail;
- whether the image contains text or sharp edges;
- the final dimensions.
A quality setting of 50 in one compression tool also does not necessarily produce the same result as 50 in another tool.
So the safest approach is to start with a small group of images.
For example:
- Select several typical product images.
- Optimize them using your intended quality setting.
- Compare them with the originals.
- Check both desktop and mobile.
- Zoom in on important product details.
- Compare the new file sizes.
- Only apply the setting to the full catalog if the result is acceptable.
If you use Super Speed, the module recommends 50% as a starting point for image quality. You can increase it to 60% or 70% if you need better image quality. The best setting depends on your images, so test the results rather than treating 50% as a fixed rule.
A store selling products where fine details matter may prefer higher quality. A decorative banner may tolerate stronger compression.
Do not begin by processing thousands of images. Test first.
5. Choose the Right Format: JPEG, PNG or WebP
Image format is another part of optimization.
JPEG, PNG and WebP are not different quality levels. They are different image formats with different strengths.
| Format | Best suited for |
|---|---|
| JPEG | Product photos and other photographic images |
| PNG | Images that need transparency or very sharp graphic elements |
| WebP | Web delivery where a smaller file can be produced with acceptable visual quality |
For many ecommerce photos, WebP can create a smaller file than JPEG or PNG at similar visual quality.
But WebP is not a magic replacement for the other optimization steps.
A 3000 × 3000 px WebP image can still be much larger than the page needs.
The full process is still:
Correct dimensions → Efficient compression → Appropriate format → Appropriate loading behavior
Should every image be converted to WebP? Not necessarily.
Use WebP when it produces a useful reduction in file size and fits your image workflow.
JPEG can still work well for product photography. PNG remains useful when transparency or particular graphic characteristics are important.
The practical question is not: “Is WebP always better?”
It is: “Does WebP make this image smaller while keeping the quality I need?”
In Super Speed, WebP conversion is available for product images. The module can also optimize other supported image types through its image optimization features.
6. Use Lazy Load for Images That Are Not Needed Yet
Compression and WebP reduce how much data the browser downloads.
Lazy Load changes when the browser downloads it.
This difference is important.
Imagine a category page with many product images.
Without Lazy Load, the browser may start downloading images near the bottom of the page even though the visitor cannot see them yet.
With Lazy Load, those off-screen images wait until the visitor scrolls closer to them.
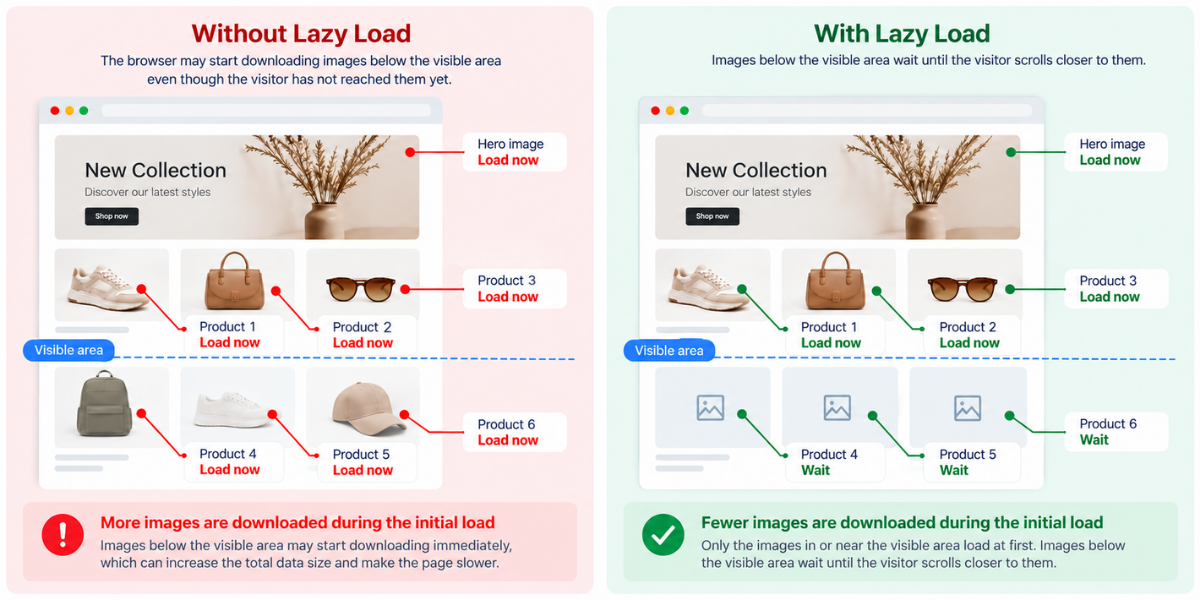
This reduces the amount of image data competing for bandwidth during the initial page load.
Which images should use Lazy Load?
A simple rule is:
Visible immediately when the page opens → normally load it immediately.
Farther down the page → consider Lazy Load.
Good Lazy Load candidates often include:
- product images farther down a category page;
- images inside long CMS content;
- lower-page banners;
- related-product images below the initial viewport.
A Practical PrestaShop Image Optimization Workflow
When optimizing images, follow a clear order instead of changing everything at once. Start with image dimensions, then check file size, format, and compression. Next, decide which images should use Lazy Load, check the visual quality, and finally measure the page again to confirm the improvement.
The workflow below summarizes these steps:
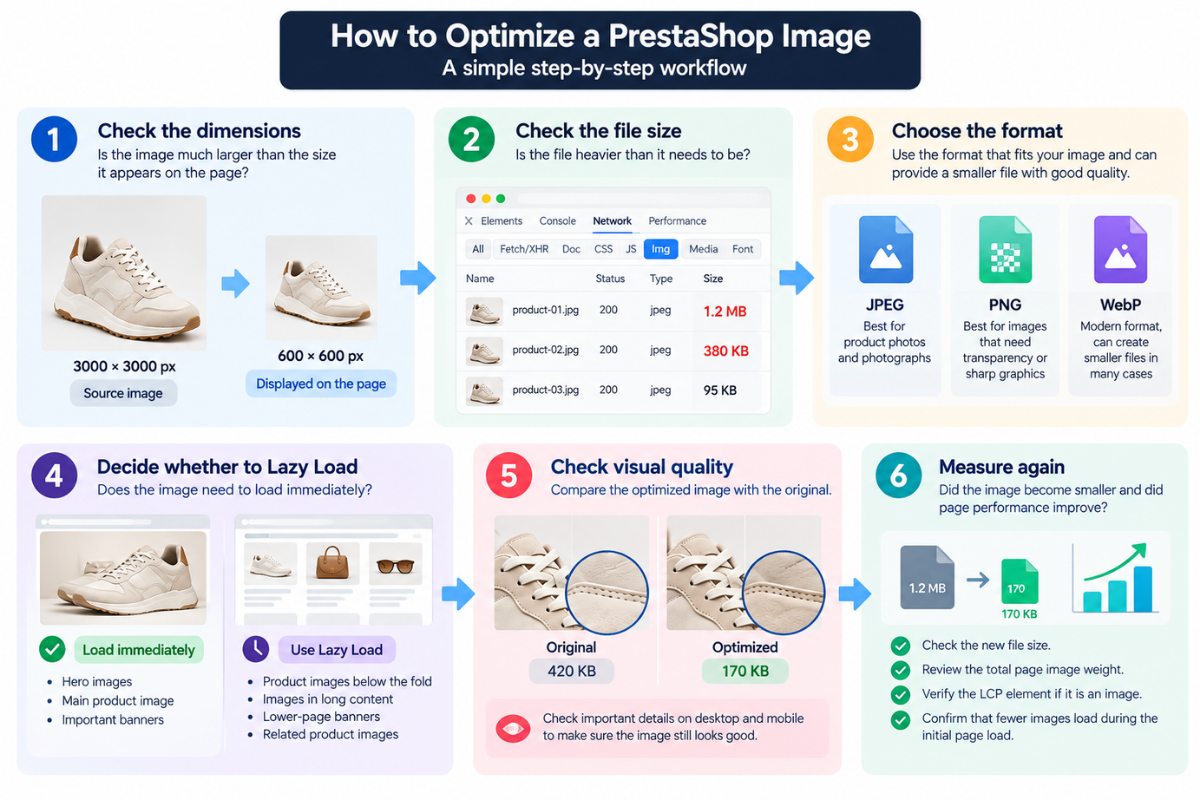
Following this workflow helps you optimize images step by step. For a small number of images, you can handle many of these checks manually. On stores with hundreds or thousands of images, however, repeating the same optimization work can take time.
If you want a simpler approach, Super Speed can automate several of these tasks for you. It can compress images, convert product images to WebP, optimize both existing and newly uploaded images, and apply configurable Lazy Load across your store.
You should still check the visual result and measure your page again after optimization. The goal is not simply to make images smaller, but to reduce unnecessary image weight while keeping them clear and sharp.