How to Back Up Files/Folders Using FTP Before Updating Your Website/Theme/Module
Who is this guide for?
This guide is specifically for PrestaShop administrators, developers, and website managers who want to protect their custom modifications before updating their PrestaShop store. Since updates can overwrite theme files, custom modules, or core modifications, backing up ensures that you can restore your custom code if necessary.
After fixing errors or customizing a site/module, a developer may send you a list of files and folders that were modified. For example:
"Edited files:
1. Module cs_invisible_recaptcha_v2
public_html/modules/cs_invisible_recaptcha_v2/override/controllers/front/ContactController.php
2. Module ets_advancedcaptcha
public_html/modules/ets_advancedcaptcha/ets_advancedcaptcha.php
public_html/modules/ets_advancedcaptcha/override/controllers/front/ContactController.php
3. Fixed in theme
public_html/themes/warehouse/modules/ps_emailsubscription/views/templates/hook/ps_emailsubscription.tpl
public_html/themes/warehouse/modules/contactform/views/templates/widget/contactform-elementor.tpl”
Save this list of modified files in a safe place. When updating PrestaShop or a module, you can refer to this list to check and restore necessary customizations. If you are unsure how to back up or restore files after an update, ask your developer or technical team for help.
Why should you back up before updating?
When developers make custom modifications to a theme or module, these changes may be lost when updating to a new version of PrestaShop or a new version of the module/theme. To prevent this and avoid losing previous customizations, it's essential to back up modified files before updating. This helps:
- Easily restore custom code after an update.
- Contact developers to reapply modifications to the new version if needed.
- Maintain a stable working version for reference in case of issues.
How to use FTP to download backup files
Step 1: Install and connect to FTP
You can use one of the following programs to connect to FTP:
- FileZilla (Free and easy to use)
- WinSCP (Supports FTP, SFTP, SCP)
- Cyberduck (User-friendly, supports multiple protocols)
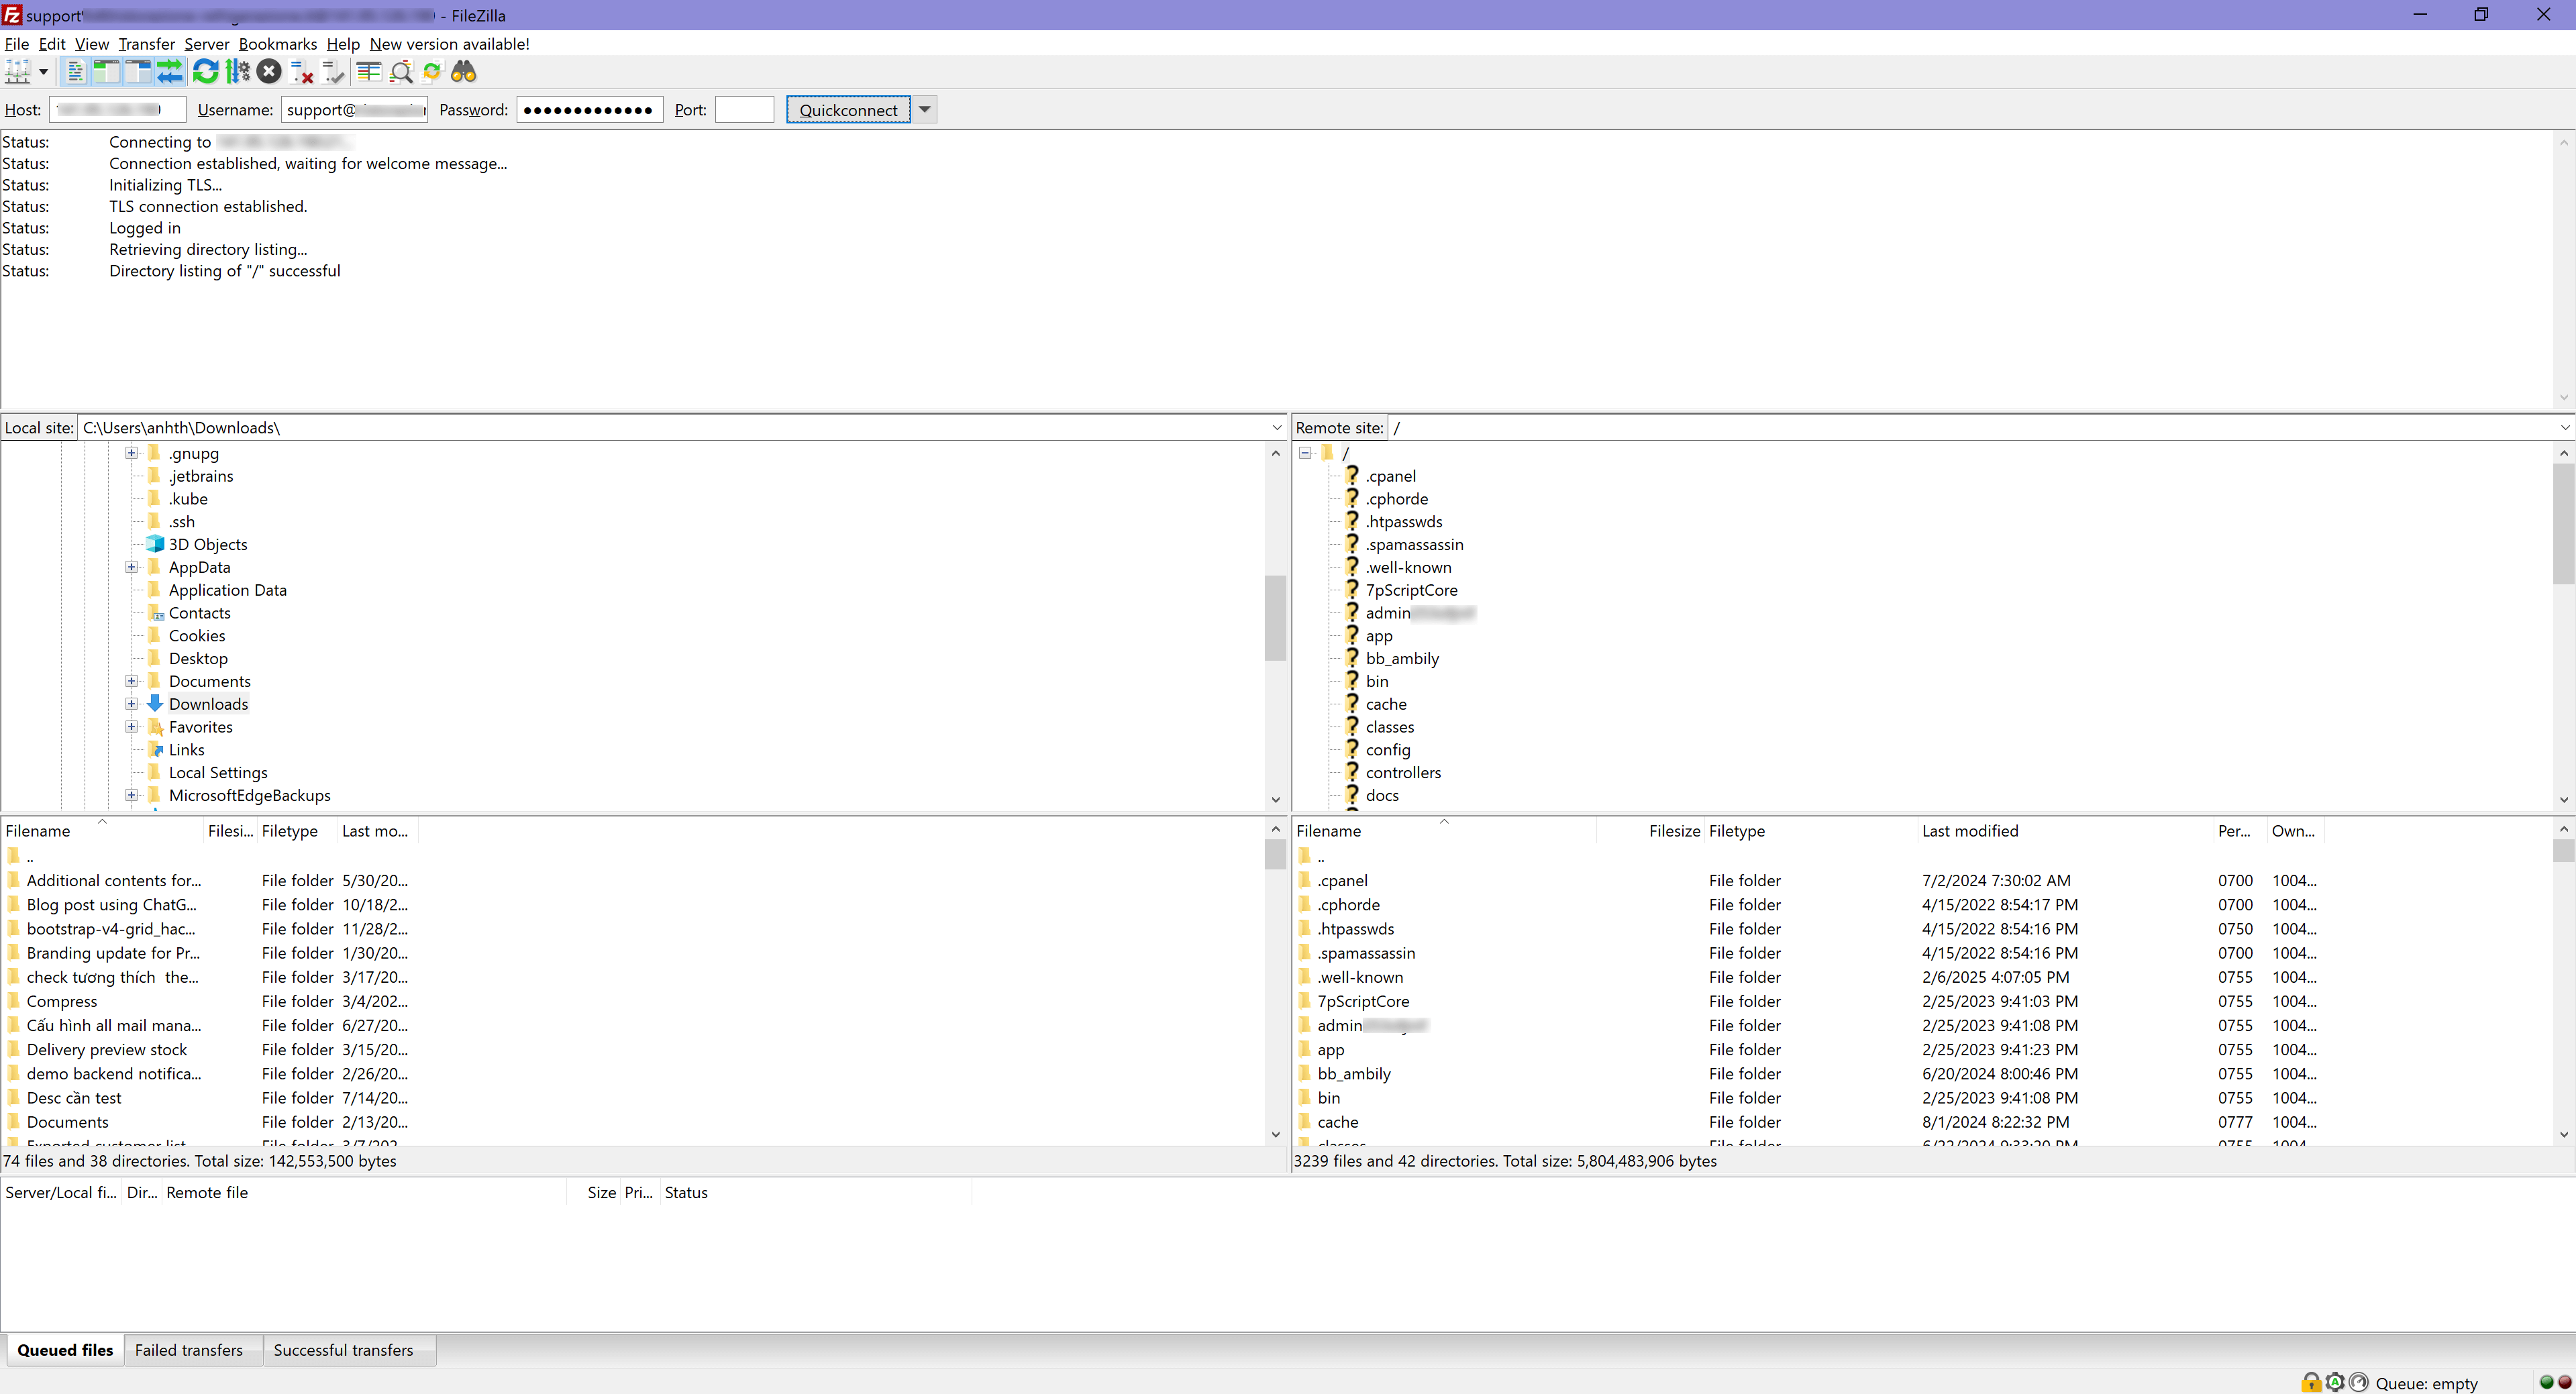
Connecting to the Server with FileZilla
1. Open FileZilla.
2. Enter the connection details:
- Host: Server address
- Username: Your login username
- Password: Your password
- Port: (Typically 21 for FTP, 22 for SFTP)
3. Click "Quick connect" to connect to the server.
4. Once connected, the left panel shows files on your computer, and the right panel displays files on the server.
Connecting to the Server with WinSCP
1. Open WinSCP.
2. Select the connection protocol (FTP, SFTP, or SCP).
3. Enter the connection details:
- Host name: Server address
- Username: Your login username
- Password: Your password
- Port number: (21 for FTP, 22 for SFTP)
4. Click "Login" to connect.
5. Once connected, you can drag and drop files between your computer and the server.

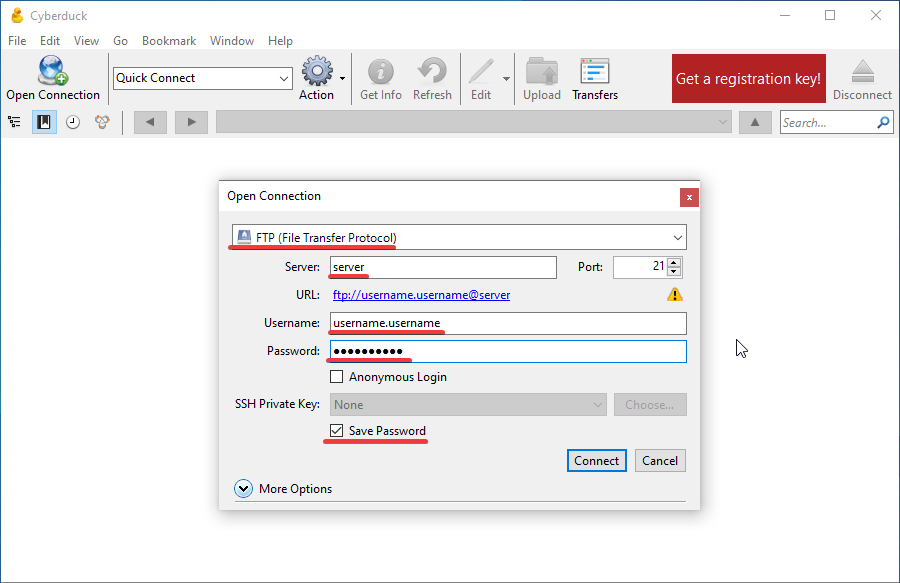
Connecting to the Server with Cyberduck
1. Open Cyberduck.
2. Click "Open Connection".
3. Select the connection protocol (FTP, SFTP, WebDAV, etc.).
4. Enter the connection details:
- Server: Server address
- Username: Your login username
- Password: Your password
- Port: (21 for FTP, 22 for SFTP)
5. Click "Connect".
6. Once connected, you can manage files directly through the Cyberduck interface.
Step 2: Identify files and folders to back up
For PrestaShop, pay special attention to these key directories:
Modules: /modules/module_name (if you have installed or customized a module)
Themes: /themes/theme_name (if you are using a specific theme)
Core modifications:
- /override (contains override files for PrestaShop’s core functions)
- /classes (may contain modifications to core classes)
- /controllers (if any controller has been customized)
- /translations (if you have custom translations)
Step 3: Download files to your computer
1. Select the files/folders you want to back up in the right panel (server).
2. Choose a location on your computer (left panel) where the files should be saved.
3. Right-click and choose Download.
4. Save the files in an organized folder on your computer. To store and share backups more easily, compress the folder into a .zip or .tar.gz file.
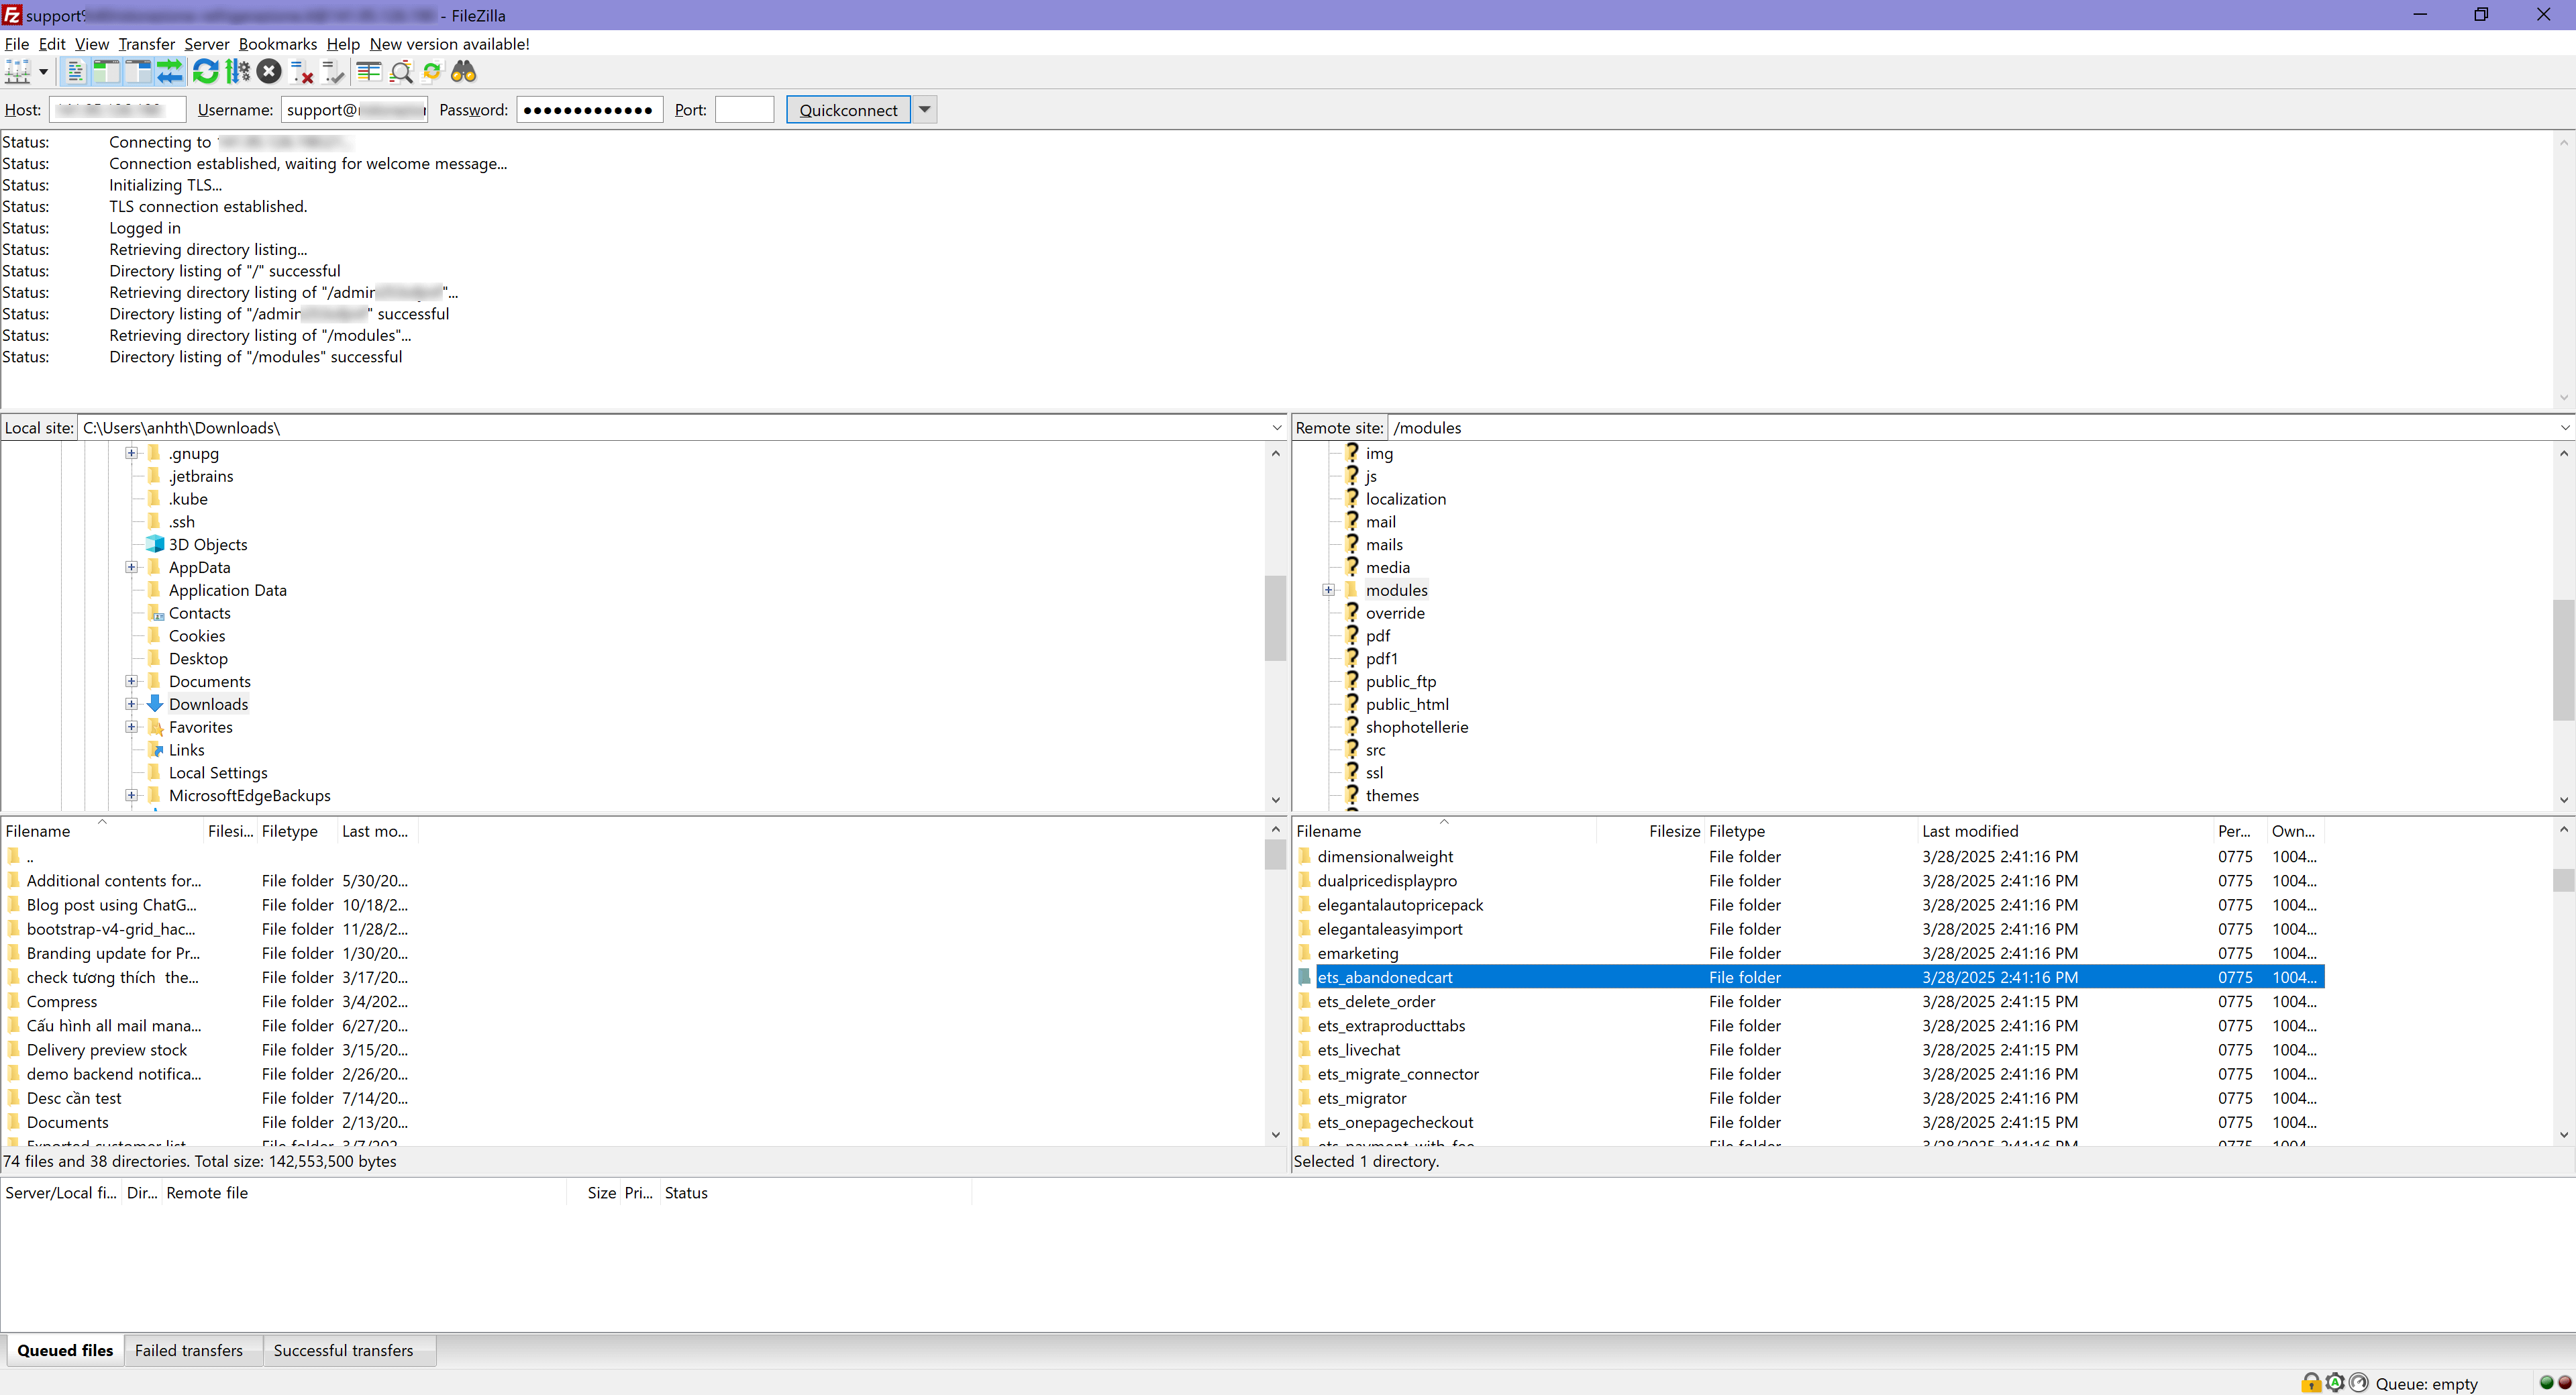
Example: Downloading a module using FileZilla
Here is a step-by-step example of how to use FileZilla to download the “Abandoned Cart Reminder” module (ets_abandonedcart) to your computer:
1. Open FileZilla and connect to your server using FTP credentials.
2. Navigate to the “Abandoned Cart Reminder” module folder in the right panel (server files): /modules/ets_abandonedcart
3. Choose a local destination folder in the left panel (your computer). In this example, I selected the “Compress” folder.

4. Right-click the module folder in the right panel and select “Download” and wait until it’s showing Downloaded successfully in the notification.
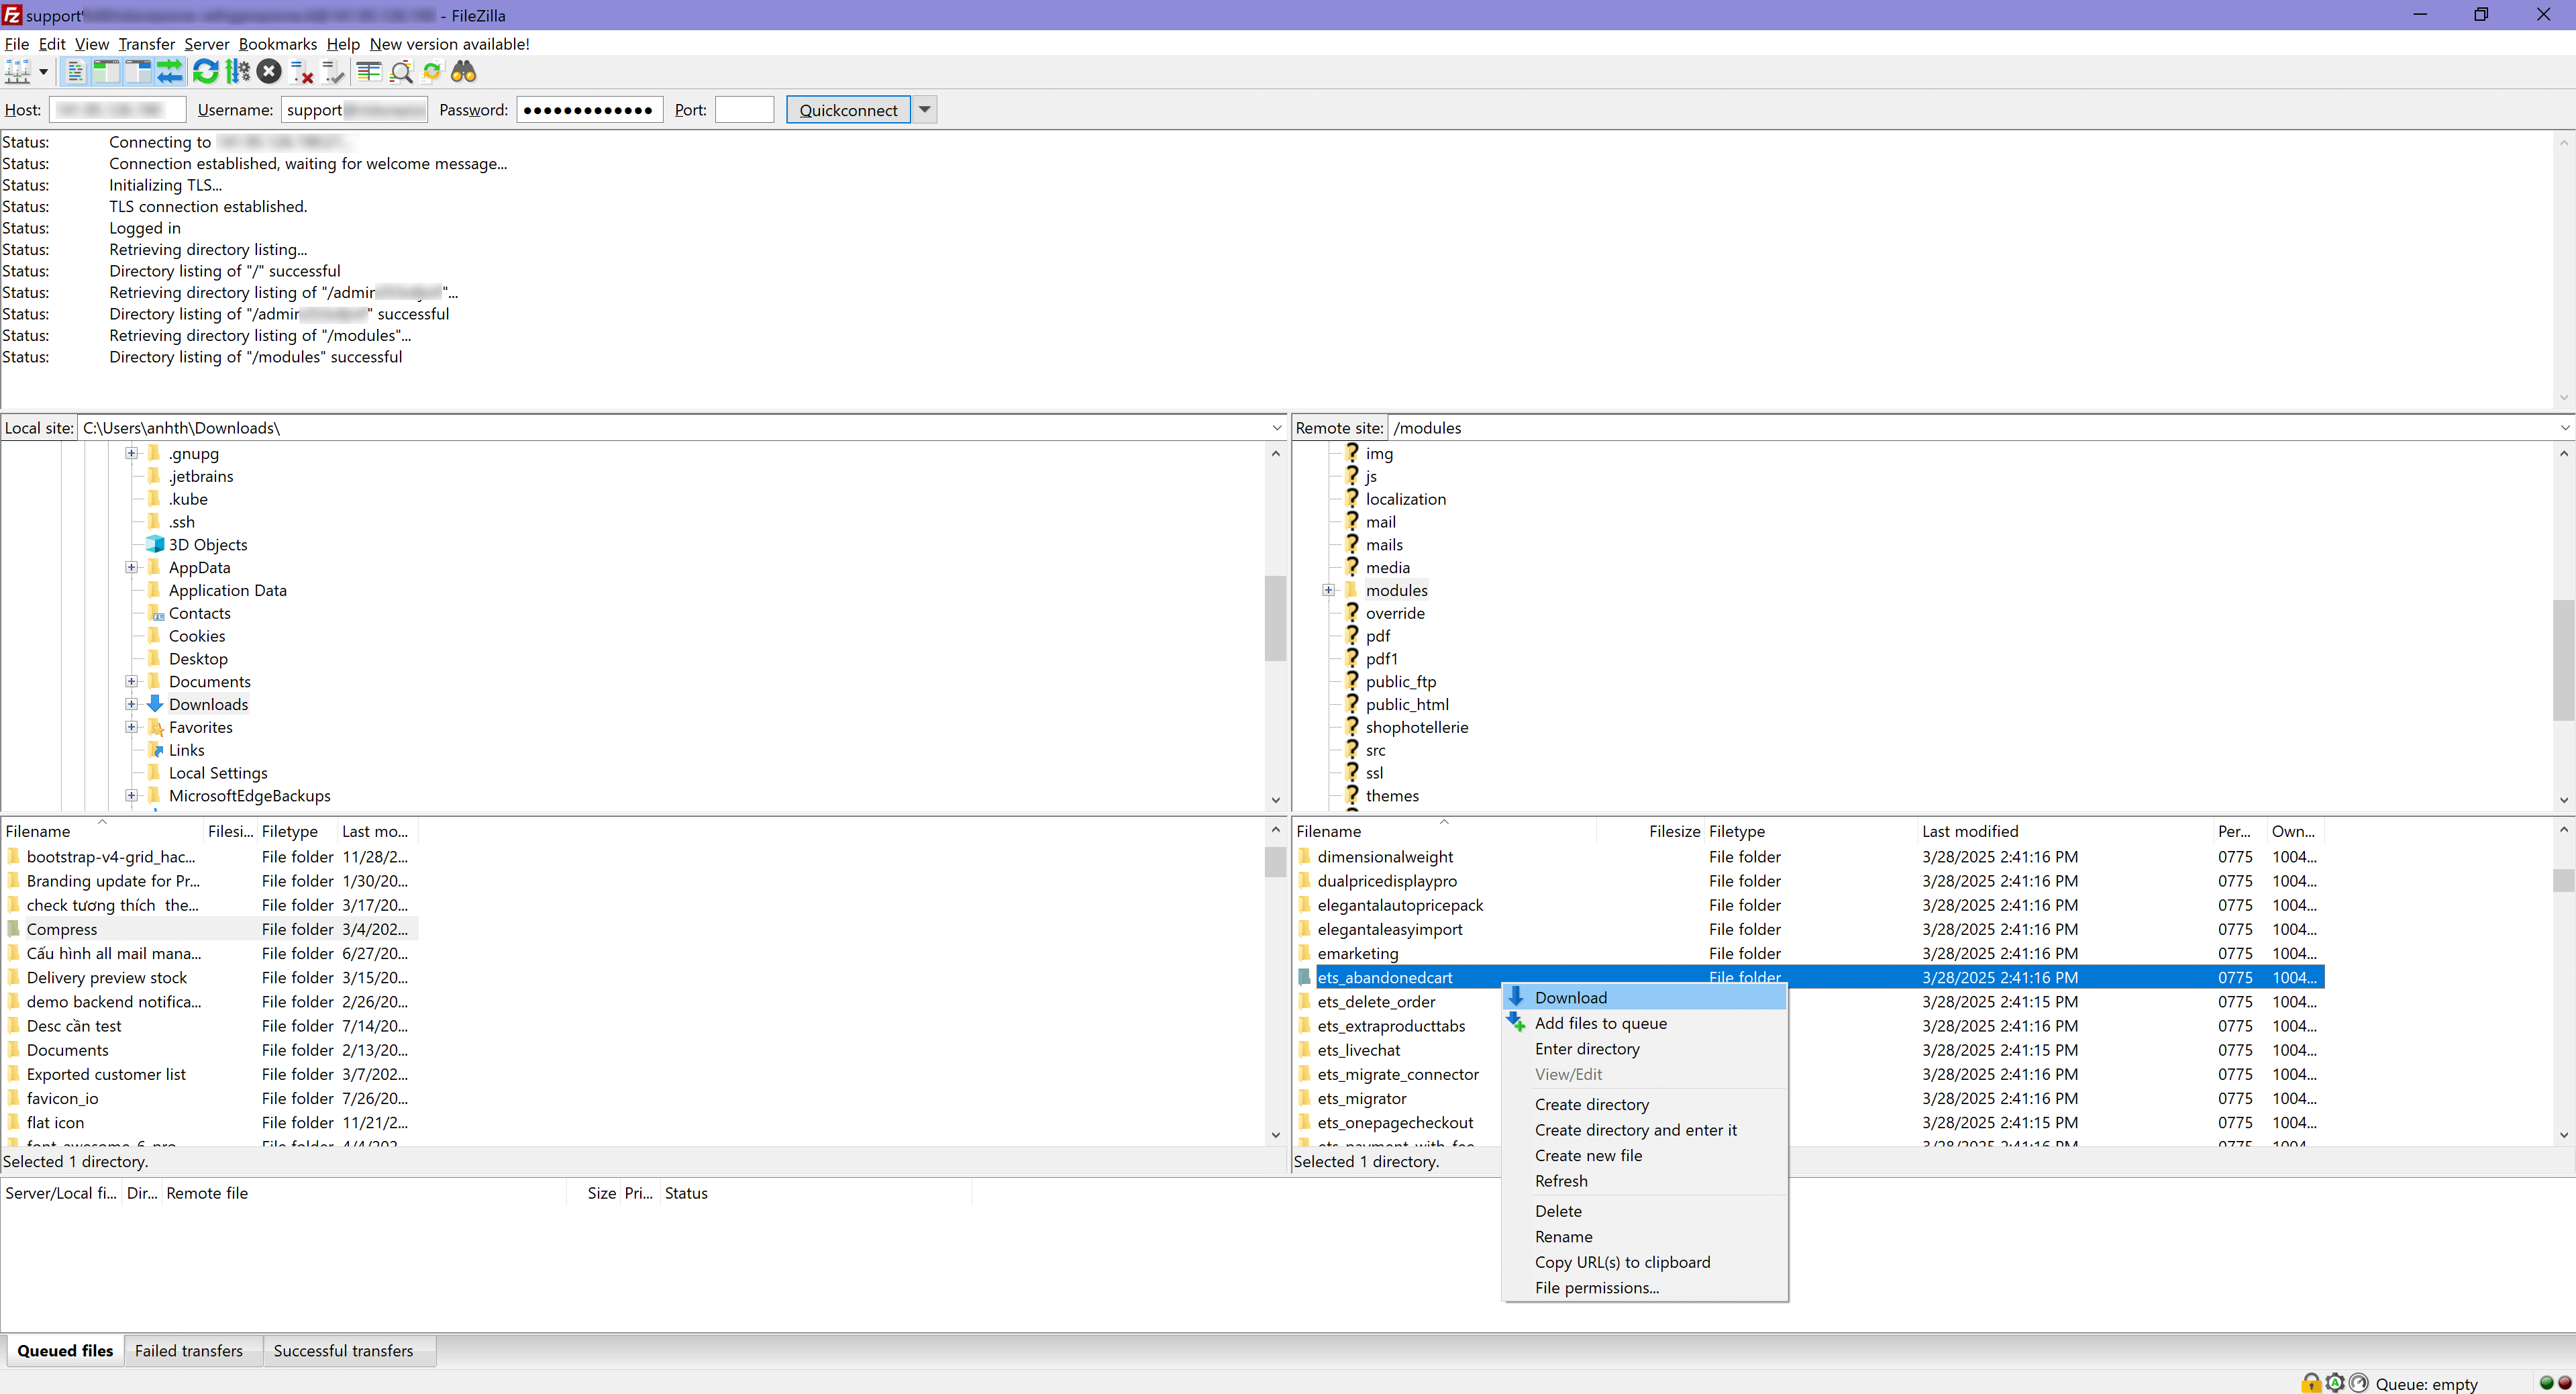
5. The module files will be copied to your computer in the selected destination folder.
Note: If you want to download a theme, specific file, or other directories instead of a module, simply navigate to the correct file/folder and follow the same steps to download.
What to do if custom code is lost after updating?
1. Compare with the backup: If any modifications are lost, refer to your backup files.
2. Contact the developer: If you’re unsure how to restore changes, send the backup to your developer so they can reapply modifications to the new version.
3. Test your PrestaShop store: After restoring custom code, test your site’s functionality, including themes, modules, and checkout processes, to ensure everything works correctly.
Backing up files before updating is a crucial step to prevent data loss. Always perform a backup before updating to ensure system stability.